Click on the queries to get the answers.
What are the fundamental safety precautions for using a magnetic drilling machine?
What are the fundamental safety precautions for using a magnetic drilling machine?

Do not use the machine in flammable or potentially explosive environments.
Persons who due to their physical, mental or motor response abilities are unable to operate the machine safely may only use the machine under supervision or instruction by a responsible person.
Persons with heart pacemakers or other medical implants must not use this machine.
Children must not be allowed to use the machine.
Inspect the machine for visible signs of damage before use. Do not use a visibly damaged machine.
Before beginning work, check the condition of the safety chain and the function of the switches on the machine.
Repairs to the mains cable may only be carried out by a qualified electrician.
Repairs to the machine may only be carried out by an authorised workshop or by the works after-sales service. Unqualified repairs can lead to considerable danger for the user.
Repairs to the machine during the warranty period may only be carried out by a service centre authorised by the manufacturer, as otherwise the warranty will be voided.
Defective parts may only be replaced with original spare parts. Only these parts guarantee that the safety requirements are satisfied.
Do not leave the machine unsupervised during operation.
Store the machine in a dry, temperate location out of the reach of children.
Do not leave the machine standing outdoors and do not expose it to moisture.
Make sure that your work area is sufficiently lit (>300 Lux).
Do not use low power machines for heavy working.
Make sure that your workplace is clean.
Keep the machine clean, dry and free of oil and grease.
Follow the instructions on lubricating and cooling the tool.
Which safety precautions should be observed to avoid injuring yourself and/or others?
Which safety precautions should be observed to avoid injuring yourself and/or others?

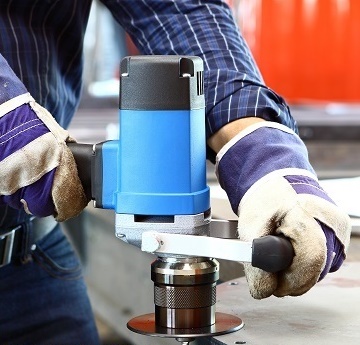
Operate the machine only with the protective equipment stipulated in these operating instructions (see section Personal protective equipment).
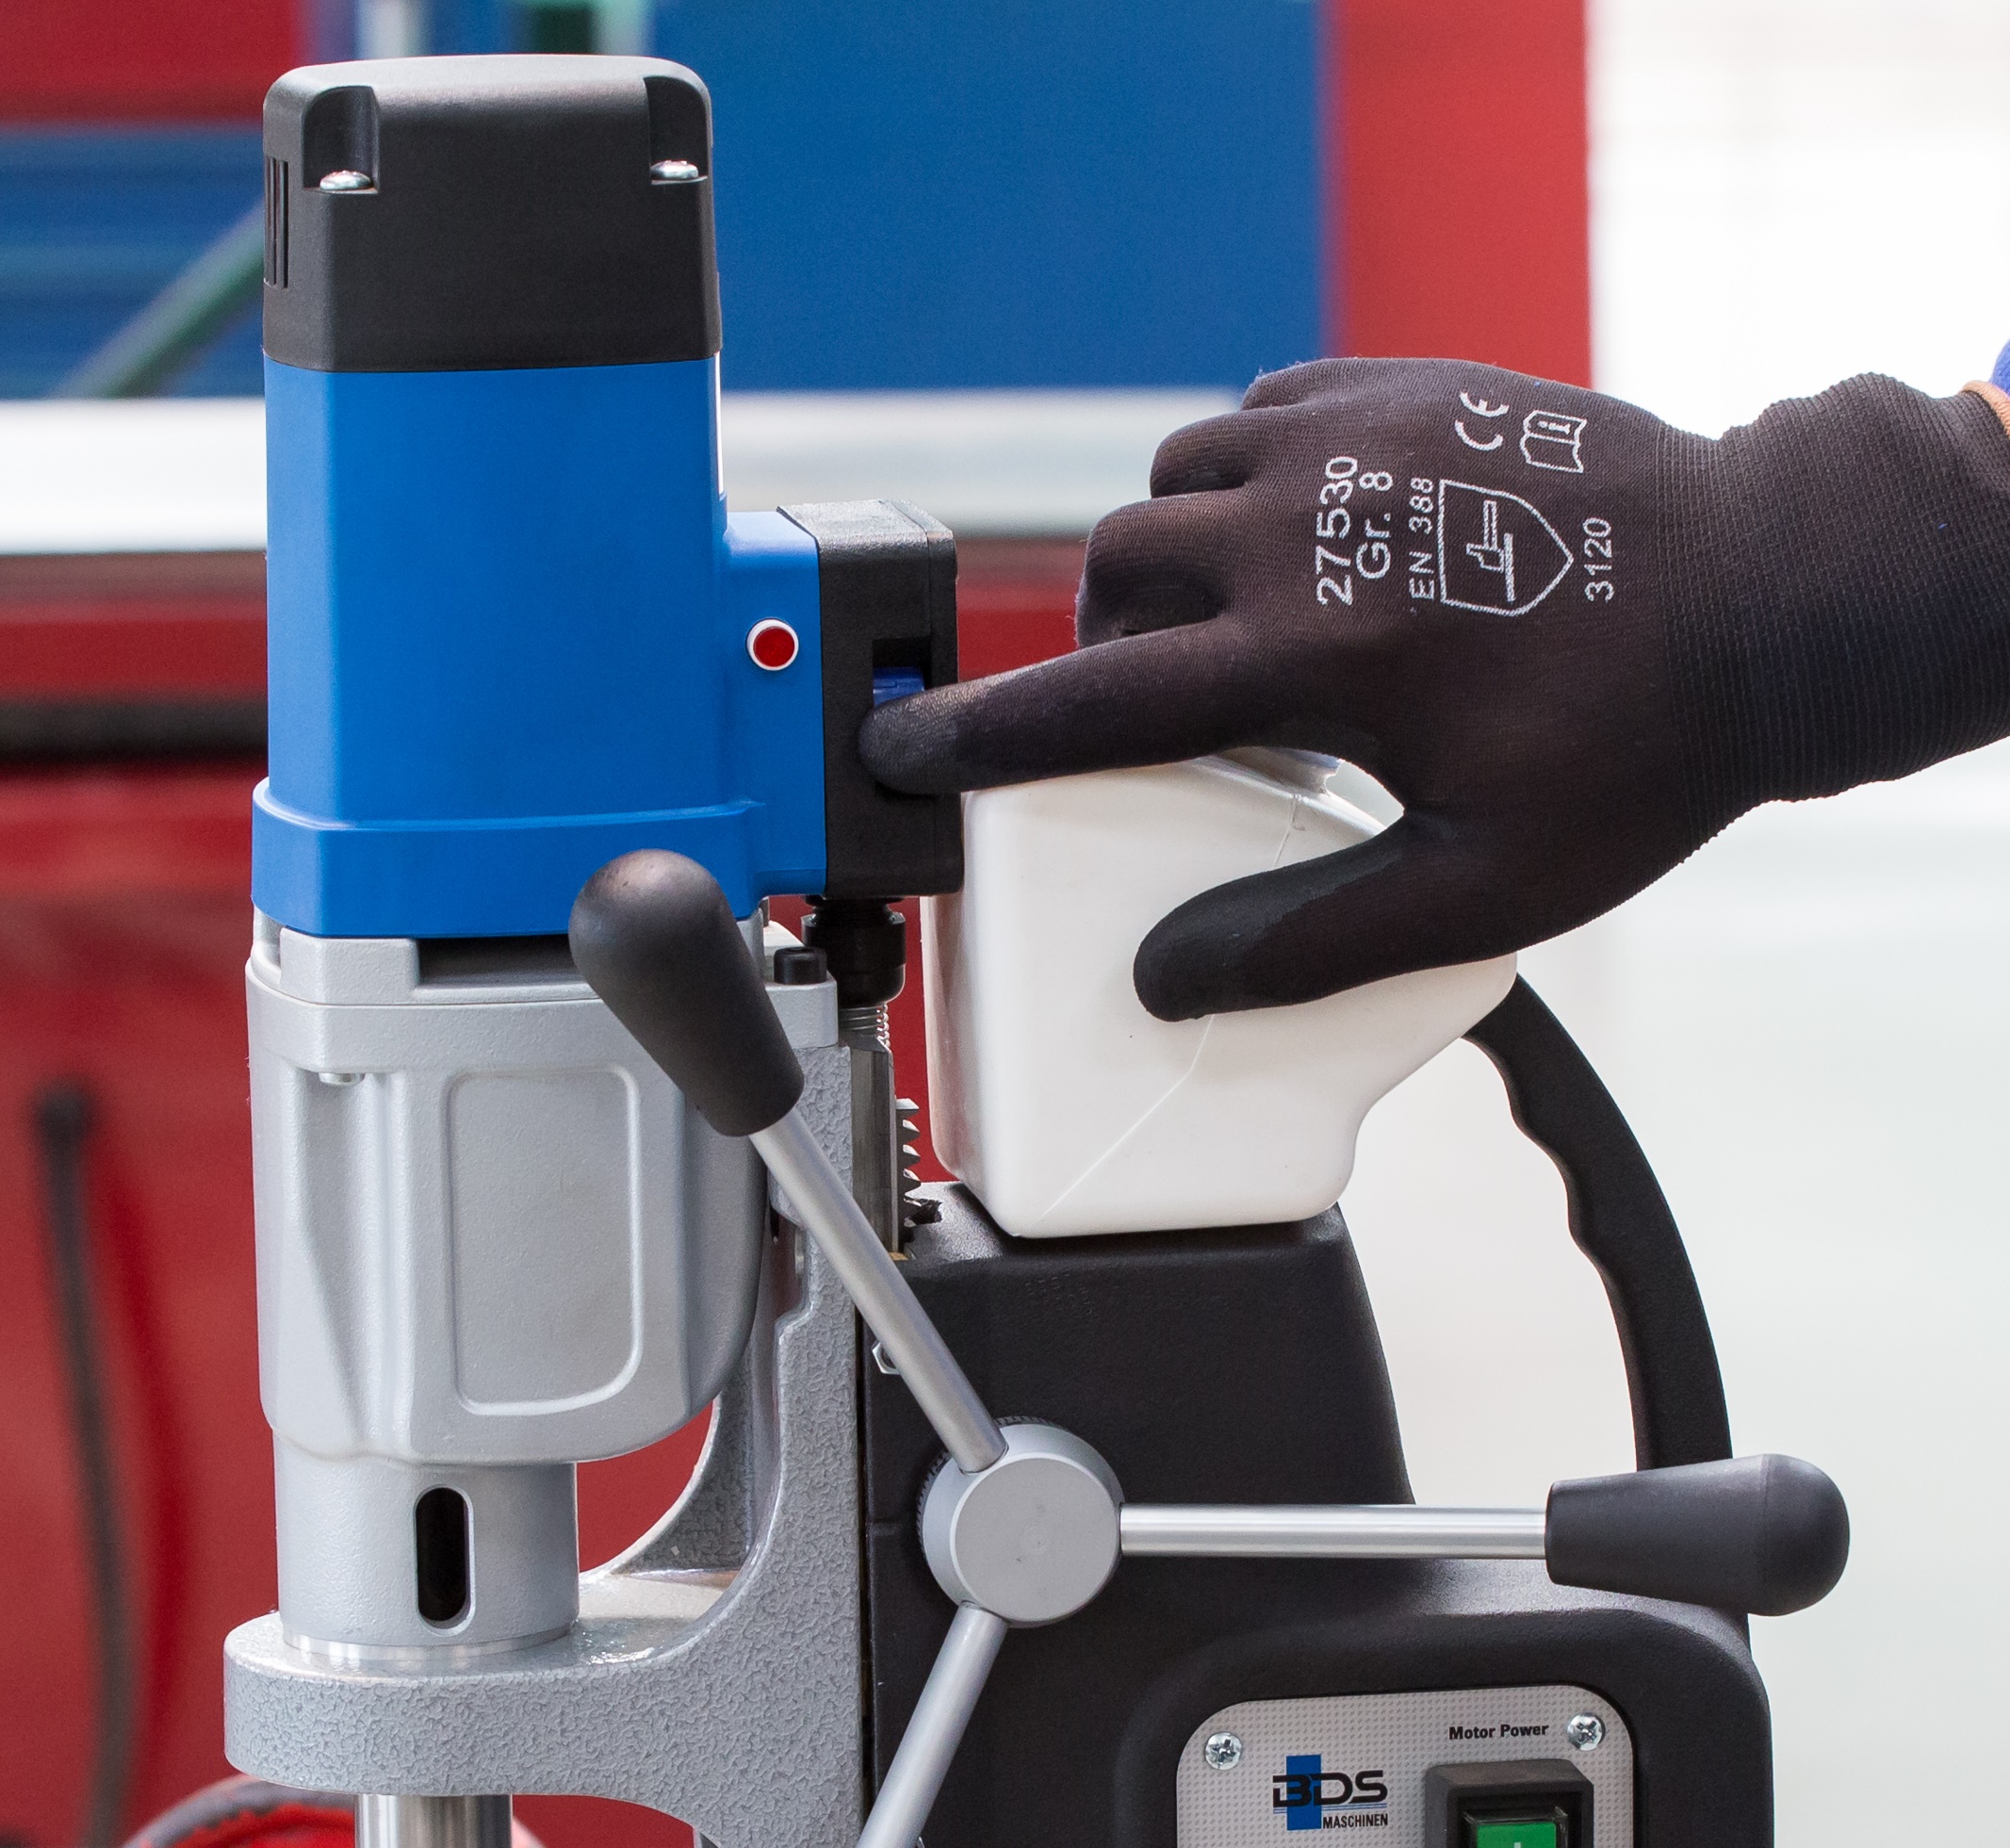
Do not wear protective gloves when the machine is running. A glove can be caught by the drilling machine and torn off the hand. Risk of losing one or more fingers.
Remove loose jewellery before beginning work. Wear a hair net if you have long hair.
Always switch off the machine before changing tools, performing maintenance or cleaning. Wait until the machine has come to a complete standstill.
Always remove the plug from the mains socket before changing tools, cleaning or performing maintenance, in order to avoid unintentional starting of the machine.
Do not put your hand into the machine while it is in operation. Remove shavings only when the machine is at a standstill. Wear protective gloves when removing swarf.
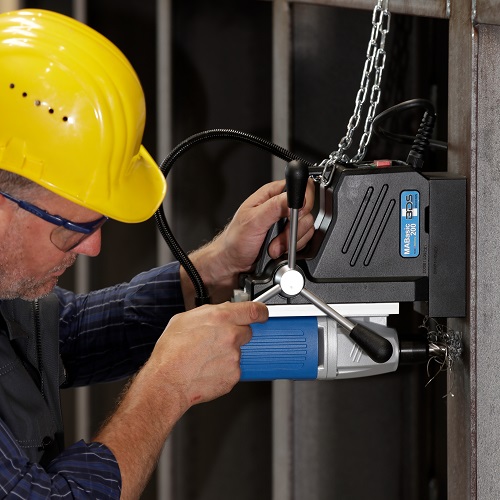
When working on scaffolding, the operator must be secured with a safety belt as the machine can oscillate dangerously in the event of interruption to the power supply.
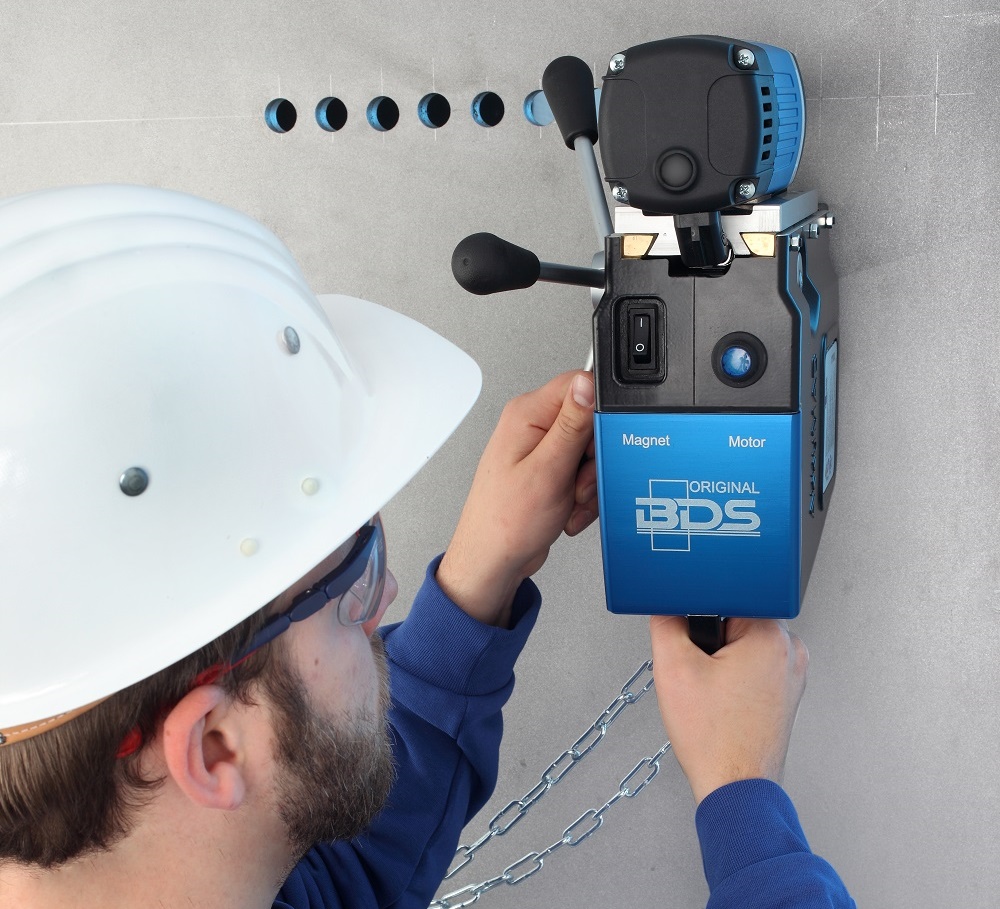
Check for secure clamping of the electromagnets on the substrate before every use (see section Preparing).
Secure the machine with the safety chain supplied when working from an inclined or vertical position or during overheadwork. The machine could fall down if the magnet is loosened or the power fails.
Check that the tool is tightened securely before using (see section Inserting the tool). Do not allow the connecting cable to hang over edges (danger of tripping).
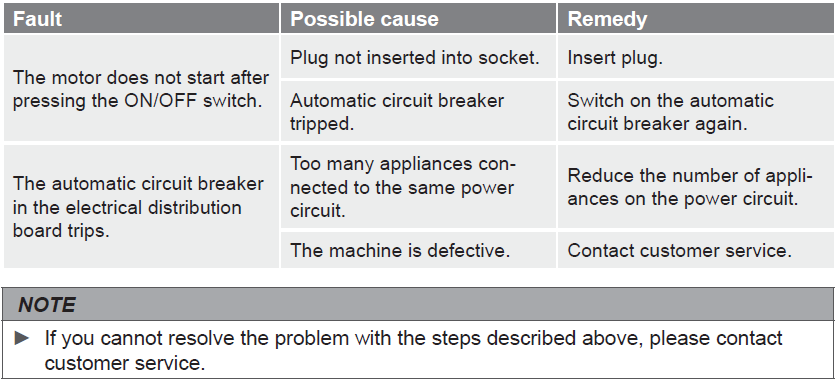
How does a MAGNET INDICATOR of a magnetic drilling machine work?
How does a MAGNET INDICATOR of a magnetic drilling machine work?
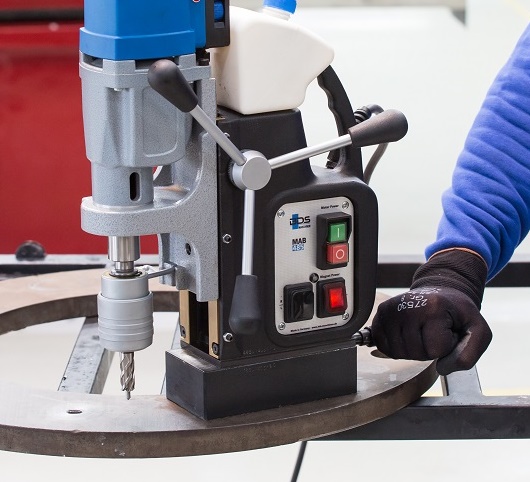
The magnet indicator provides a visual control of the magnet’s clamping force.
The magnet’s clamping force satisfies the minimum requirements. Machining can be carried out.
Insufficient magnet clamping force. Machining must not be carried out with the machine. This can be the case in the event of insufficient material thickness, uneven surface or due to paint, scale or zinc coatings.
How does a THERMAL OVERLOAD PROTECTION of a magnetic drilling machine work?
How does a THERMAL OVERLOAD PROTECTION of a magnetic drilling machine work?
The machine is additionally equipped with thermal overload protection. If the machine becomes too hot, it switches off automatically.
Carry out the following steps before continuing to work with the machine:
- Remove any blockages that may have occurred.
- Allow the machine to run at no-load speed for approx. 2 minutes.
- The machine is then ready for operation again.
What are the safety precaution for non-horizontal working position with a magnetic drill?
What are the safety precaution for non-horizontal working position with a magnetic drill?
Risk of injury from the falling machine.
When working in inclined or vertical position and during overhead work, the machine must be secured to prevent it from falling using the safety chain (E) supplied.
- Check the safety chain for proper function before every use. A damaged safety chain must not be used. Replace a damaged safety chain immediately.
- Attach the safety chain in such a way that the machine moves away from the operator in the event of slipping.
- Lay the safety chain as tightly as possible around the handle of the machine.
- Check the secure fitting of the safety chain and lock before starting work.
- Use the protective equipment stipulated in chapter Personal protective equipment.
Work on scaffolding
Risk of falling from sudden oscillating movements of the machine.
When working on scaffolding, the machine can make a sudden oscillating movement on starting or in the event of a power failure.
- Secure the machine with the safety chain (E) supplied.
- Wear a safety belt to protect yourself from falling.
How to clamp the magnet on ferrous material or magnetic material?
How to clamp the magnet on ferrous material or magnetic material?
The magnet clamping force is dependent on the condition of the substrate. The clamping force is significantly reduced by paint, zinc and scale coatings and rust.
The substrate must satisfy the following preconditions in order that a sufficient magnet clamping force can be achieved:
- The substrate must be magnetic.
- The clamping surface and the magnetic foot must be clean and grease-free.
- The clamping surface must be completely smooth and level.
NOTE
Clean the substrate and the magnetic foot of the machine before use.
Remove any unevenness and loose rust from the substrate.
BDS offers special holding devices in its range of accessories. The best clamping effect is obtained on low-carbon steel substrate with a thickness of at least 20 mm.
The best clamping effect is obtained on low-carbon steel substrate with a thickness of at least 20 mm.
How to clamp the magnet of a magnetic drilling machine on steel of low thickness?
How to clamp the magnet of a magnetic drilling machine on steel of low thickness?

When drilling in steel of low thickness, an additional steel plate (minimum dimensions 100 x 200 x 20 mm) must be placed under the workpiece. Secure the steel plate to prevent
it from falling.
How to drill Non-Ferrous materials and Stainless steel with a magnetic drilling machine?
How to drill Non-Ferrous materials and Stainless steel with a magnetic drilling machine?
A special holding device must be used when drilling in NF metals. BDS offers 2 Clamping devices For magnetic core drilling machines of the ProfiPLUS and ProfiSTART class.
For tube processing and drilling of nonferrous metals and stainless steel.
Magnetic core drilling machines from the ProfiPLUS class can in their entirety also be used for the processing of non-ferrous metals and stainless steel.
For that purpose, BDS offers clamping devices, which are provided with a pump with circular oil lubrication to build up a vacuum to ensure a safe connection
between the magnetic core drilling machine and the workpiece. Furthermore, BDS offers customized devices, which exactly meet your requirements and instructions. Just contact us!
VACUUM PLATE FOR SMOOTH SURFACES

VACUUM PLATE FOR CHANNELLED AND GUSSET PLATES

How to use KEYLESS quick change drill chuck of the magnetic drilling machine?
How to use KEYLESS quick change drill chuck of the magnetic drilling machine?
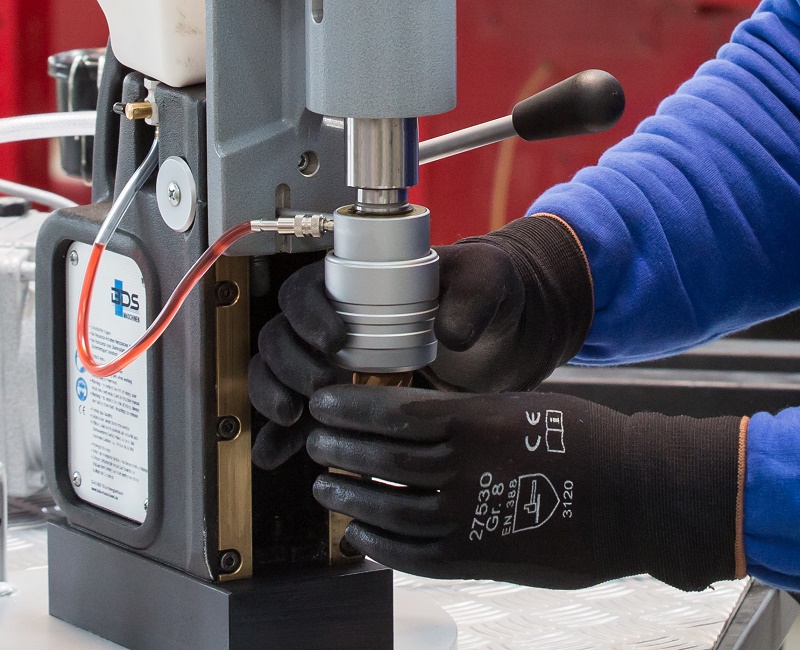
Inserting the tool
Push the KEYLESS quick-change drill chuck system intothe morse taper of the machine.
Connect the lubricant line.
Open the quick-change drill chuck system by pushing up the sleeve and insert the tool into the chuck.
Insert the appropriate ejector pin before inserting the core drill.
Check by briefly turning the tool whether the collet is engaged.
Removing the tool
Open the quick-change drill chuck system by pushing up the sleeve and pull the tool down out of the chuck.
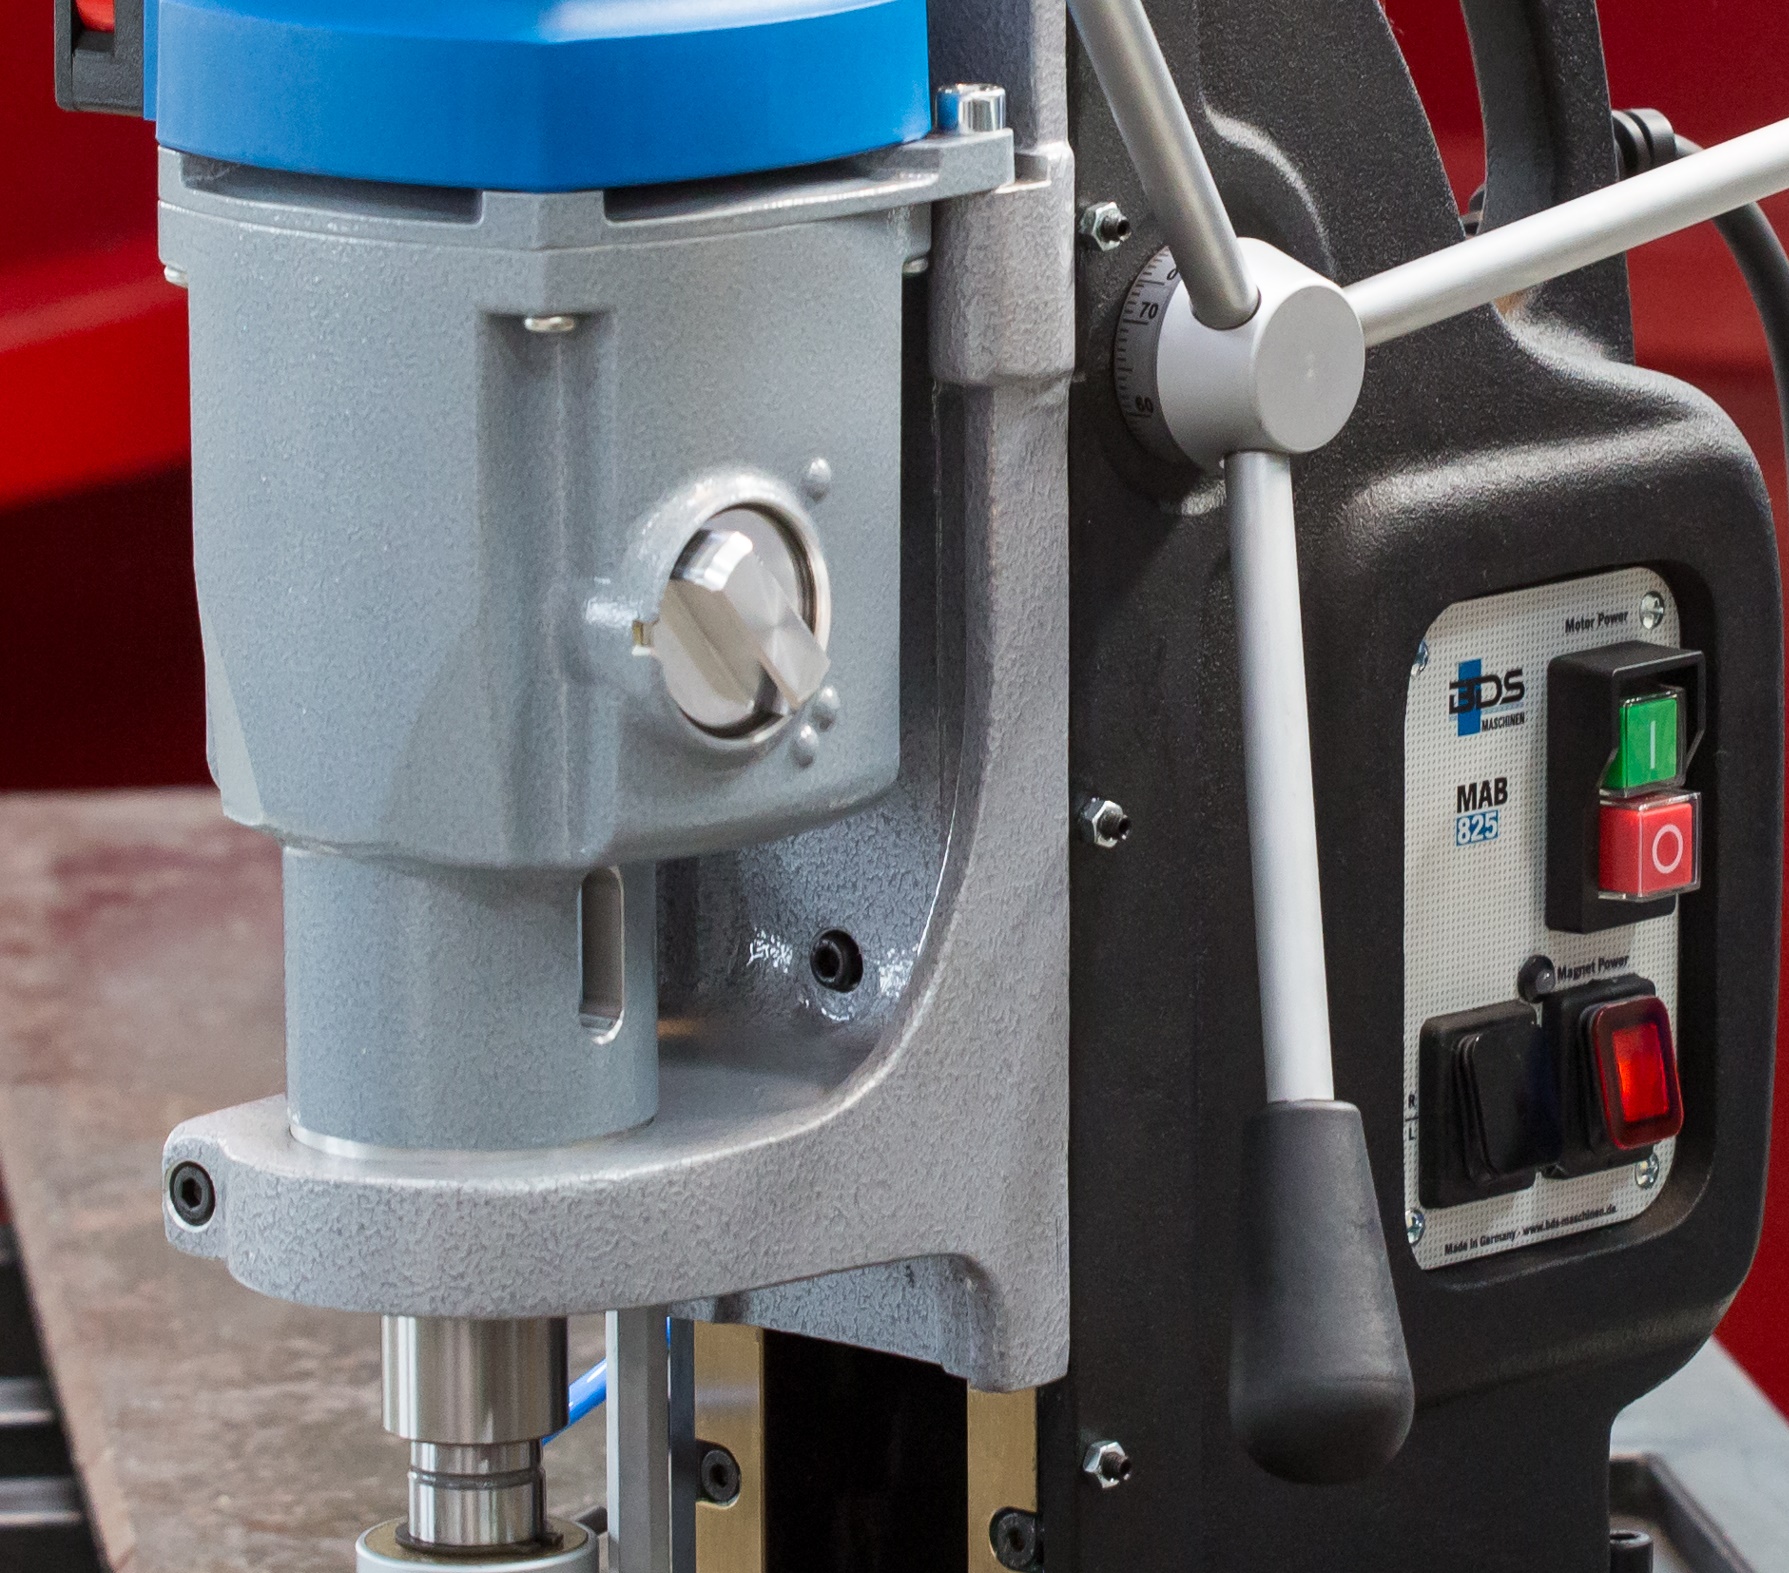
How to calculate the speed or RPM on a magnetic drilling machine?
How to calculate the speed or RPM on a magnetic drilling machine?
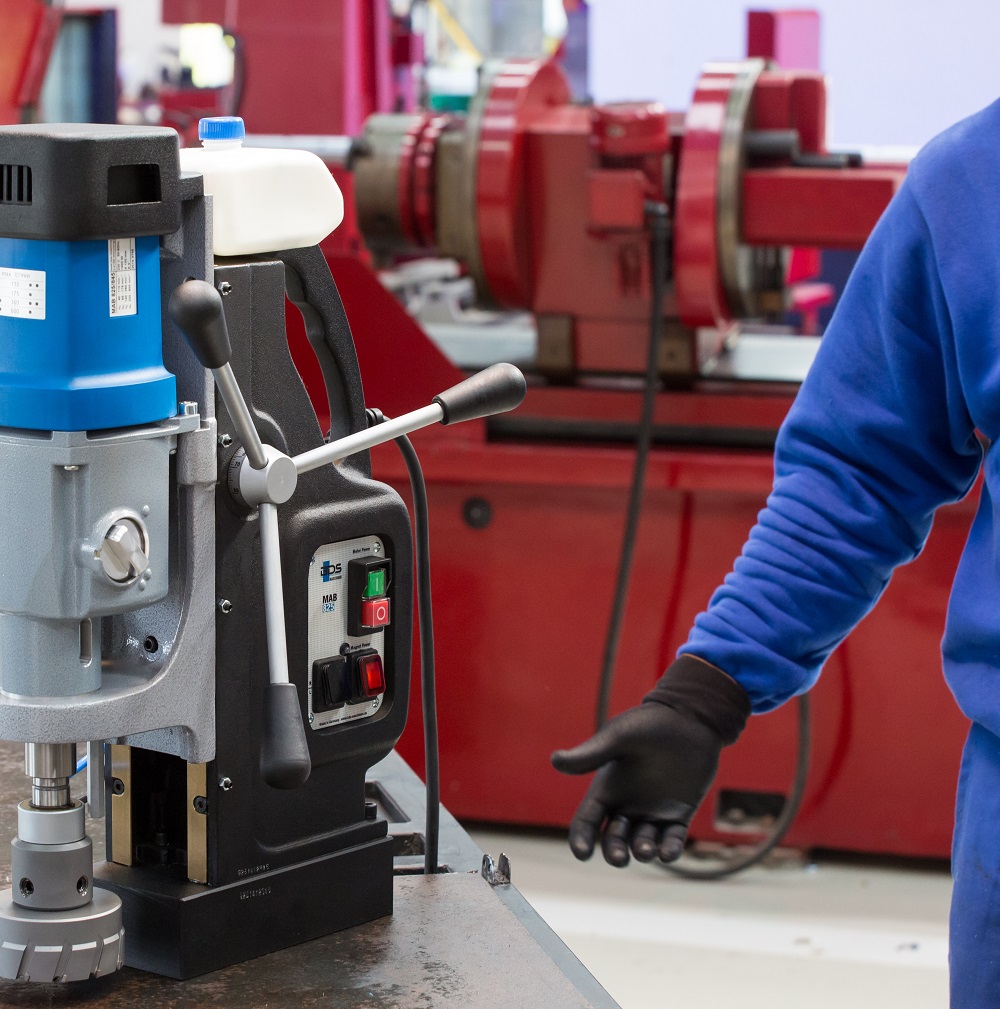
The BDS magnetic drilling machines are provided with speed gears and the ProfiPLUS machines are also equipped with variable speed control.
As per the diameter of the annular cutter and the type of annular cutter the speed of the magnetic drilling machine has to be set.
The formula for calculating the speed is:
d = diameter of the annular cutter in mm.
v = cutting speed of the annular cutters. See below chart for cutting speeds.

The alternative easy way to calculate the cutting speed is to use our automated RPM calculate on the website CLICK HERE or download our App CLICK HERE.
How to set the gears on the magnetic drilling machines?
How to set the gears on the magnetic drilling machines?
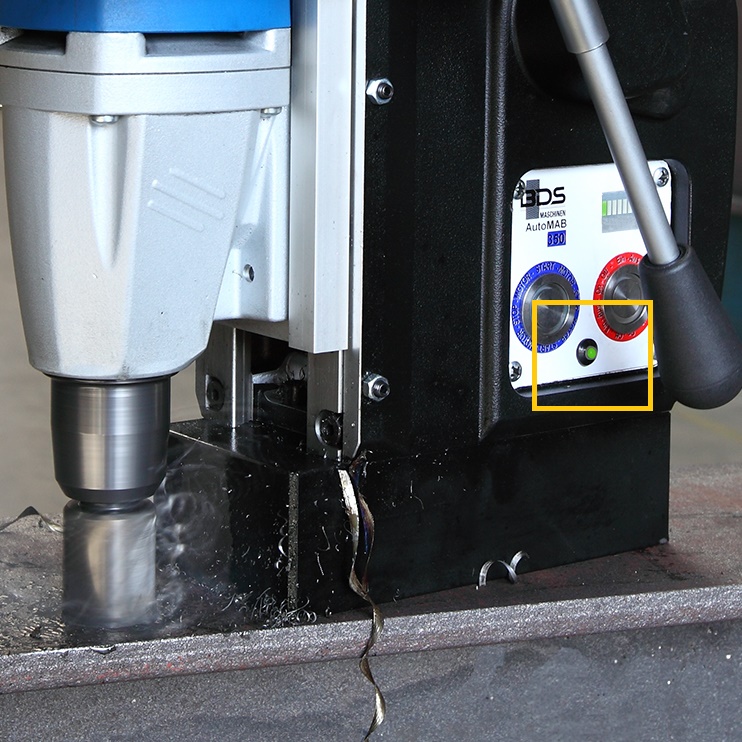
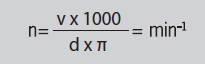
Once the speed or RPM has been calculated the next step is set the gears as per the RPM. BDS has in its range two gear and four gear machine.
Below is an example to set the gear on a four gear machine MAB 825:
The machine has a gearbox with four mechanical gear stages: The gear stage is selected by means of the two selector levers on the side of the gearbox.
To select the desired gear stage, set the two selector levers to the desired speed as shown in the table below with the machine switched off.

If calculated RPM is 360 RPM, then the machine should be set on the 3rd gear by setting the gear knob on left and right on two dots position. On ProfiPLUS machines the speedball
can also be fine tuned with the help of the variable speed control.
NOTE:
If possible, always select a setting with low gear stage and high motor speed. The motor is thus set to high torque and protected against overheating
under heavy load.
How to use the variable TORQUE CONTROL on the magnetic drilling machine?
How to use the variable TORQUE CONTROL on the magnetic drilling machine?
The BDS ProfiPLUS models MAB 525, 525SB, 825, 825V, 845 & 1300 are equipped with variable torque control.
The main purpose of the torque is for tapping or thread cutting where the need of speed is less and power is more. The torque delivers the power. More torque is more power.
As a thumb rule for drilling as well as for tapping keep the Torque control as maximum.
The other main advantage of the torque control is to protect the tool from brackage. In order to protect the tool, the maximum torque of the machine can be set using the controller.
When the maximum set torque is reached, the machine switches off. After the cut-out, the machine must be switched off and then on again at the ON/OFF switch.
CAUTION
Do not use this function to switch off the machine when cutting threads in blind holes.
How to use SWIVEL BASE on the MAB 845 magnetic drilling machine?
How to use SWIVEL BASE on the MAB 845 magnetic drilling machine?

In order to permit optimum alignment even in difficult positions, the model MAB 845 is additionally equipped with a rotating mechanism. It allows the upper part of
the machine to be rotated by 30° to both sides and by 20 mm forwards and backwards with the magnetic foot engaged.
- Loosen the locking device of the rotating mechanism.
- Position the upper part of the machine laterally and longitudinally.
- Lock the rotating mechanism again.
How to perform THREAD CUTTING with the magnetic drilling machine?
How to perform THREAD CUTTING with the magnetic drilling machine?
The machine is equipped with a reversible direction of rotation and can also be used for cutting threads.
Proceed as follows for cutting threads:
- Drill the hole for the thread.
- Switch off the machine and select the lowest gear stage and speed.
- Set the direction of rotation to clockwise (right = R) at switch.
- Chuck the thread tap in the machine using the appropriate drill tap adapter.
- Switch on the machine and set the thread tap onto the drilled hole.
- Guide the machine slide down at hand lever without exerting pressure until the desired thread length has been cut.
- Switch off the machine and set the direction of rotation to anti-clockwise (left = L) at switch.
- Switch on the machine again and allow the thread tap to come completely out of the workpiece. Then guide the machine slide upwards at hand lever to avoid damaging the start of the thread.
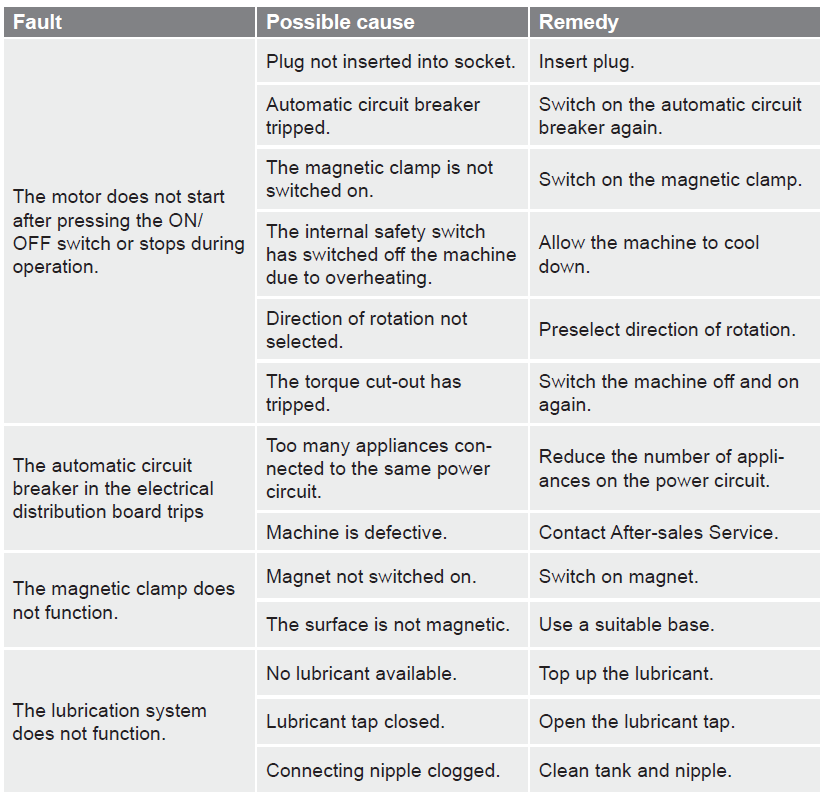
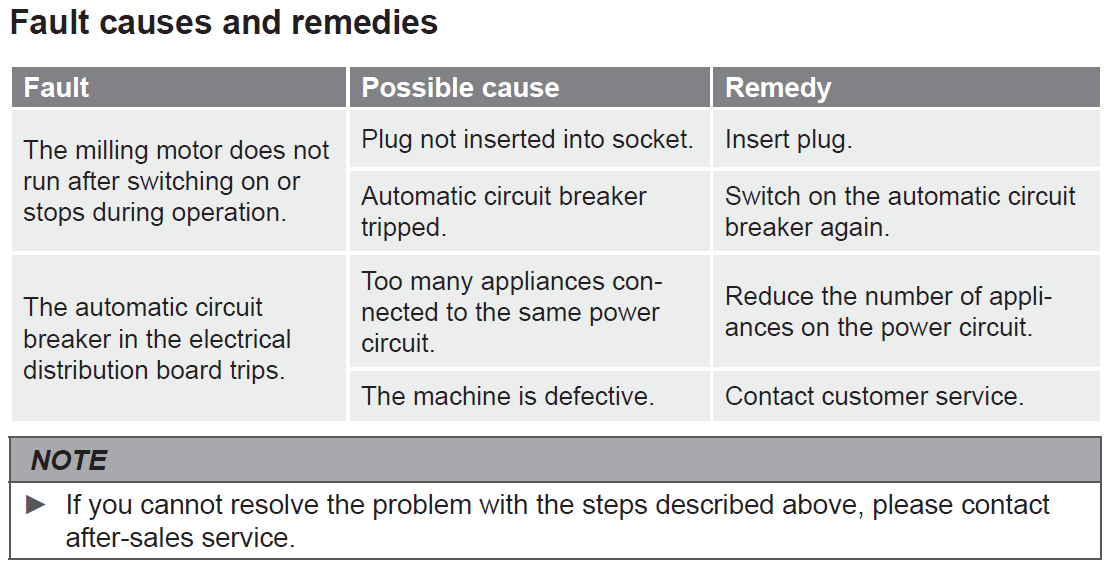
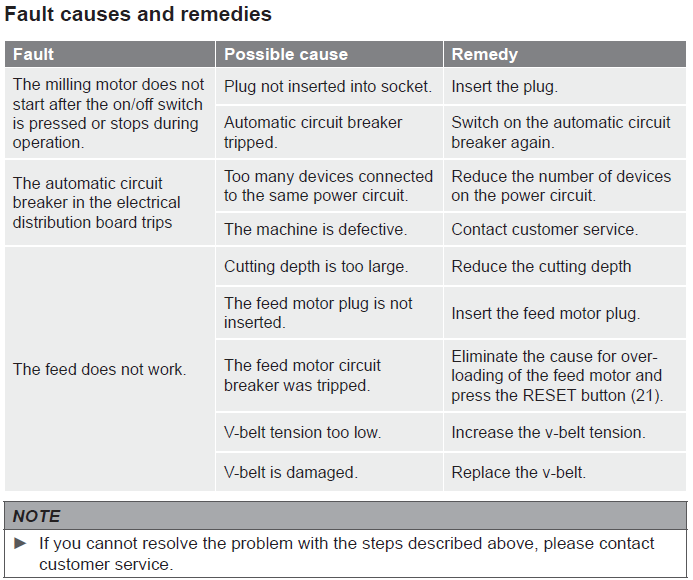
Troubleshooting for magnetic drilling machine?
Troubleshooting for magnetic drilling machine?
How to perform TUBE DRILLING with a magnetic drilling machine?
How to perform TUBE DRILLING with a magnetic drilling machine?
The below video will guide on how to perform tube drilling or pipe drilling with a magnetic drilling machine
How to select TAPPING ADAPTERS?
How to select TAPPING ADAPTERS?

All BDS ProfiPLUS machines are equipped with reversible motors to perform tapping / thread cutting. As per the size of the thread the
machine requires a tapping adapter.
Note: For each size a specific adapter is required. A single adapter can not be used for multiple thread sizes.
Following is the procedure:
1. Know the thread size to performed (example M16, M20, M30 or M42)
2. As per the thread size and the morse taper of the machine select the GSW Quick-change drill chucks.
3. Select the quick chnage insert for the thread size. For through holes use GSE Standard quick-change insert.
For blind holes use GSS Quick-change insert with safety friction clutch. (Note: The GSS Quick-change insert with
safety friction clutch can also be used for through hole tapping, but the GSE Standard quick-change insert can not
be used for blind hole tapping)
4. Insert the GSW Quick-change drill chuck into the magnetic drilling machine. Then attach the quick-change insert in the Quick-change drill chuck and then insert the tap
or thread cutting tool inside quick-change insert.

The above is a professional option for quick tapping. If, your requirement is to save money and not time then we recomend you an economical option for tapping adaptor with Weldon shank.
1. Select the TAP ADAPTER WITH WELDON SHANK as per the size of the thread.
2.Insert the tap or thread cutting tool in the tap adapter.
3. Insert the tap adpter in the machine.

The easiest way to select the tap adapter is by our automated system on the website called FIND TAPPING ADAPTER located in the Services & More
dropdown menu or just CLICK HERE.
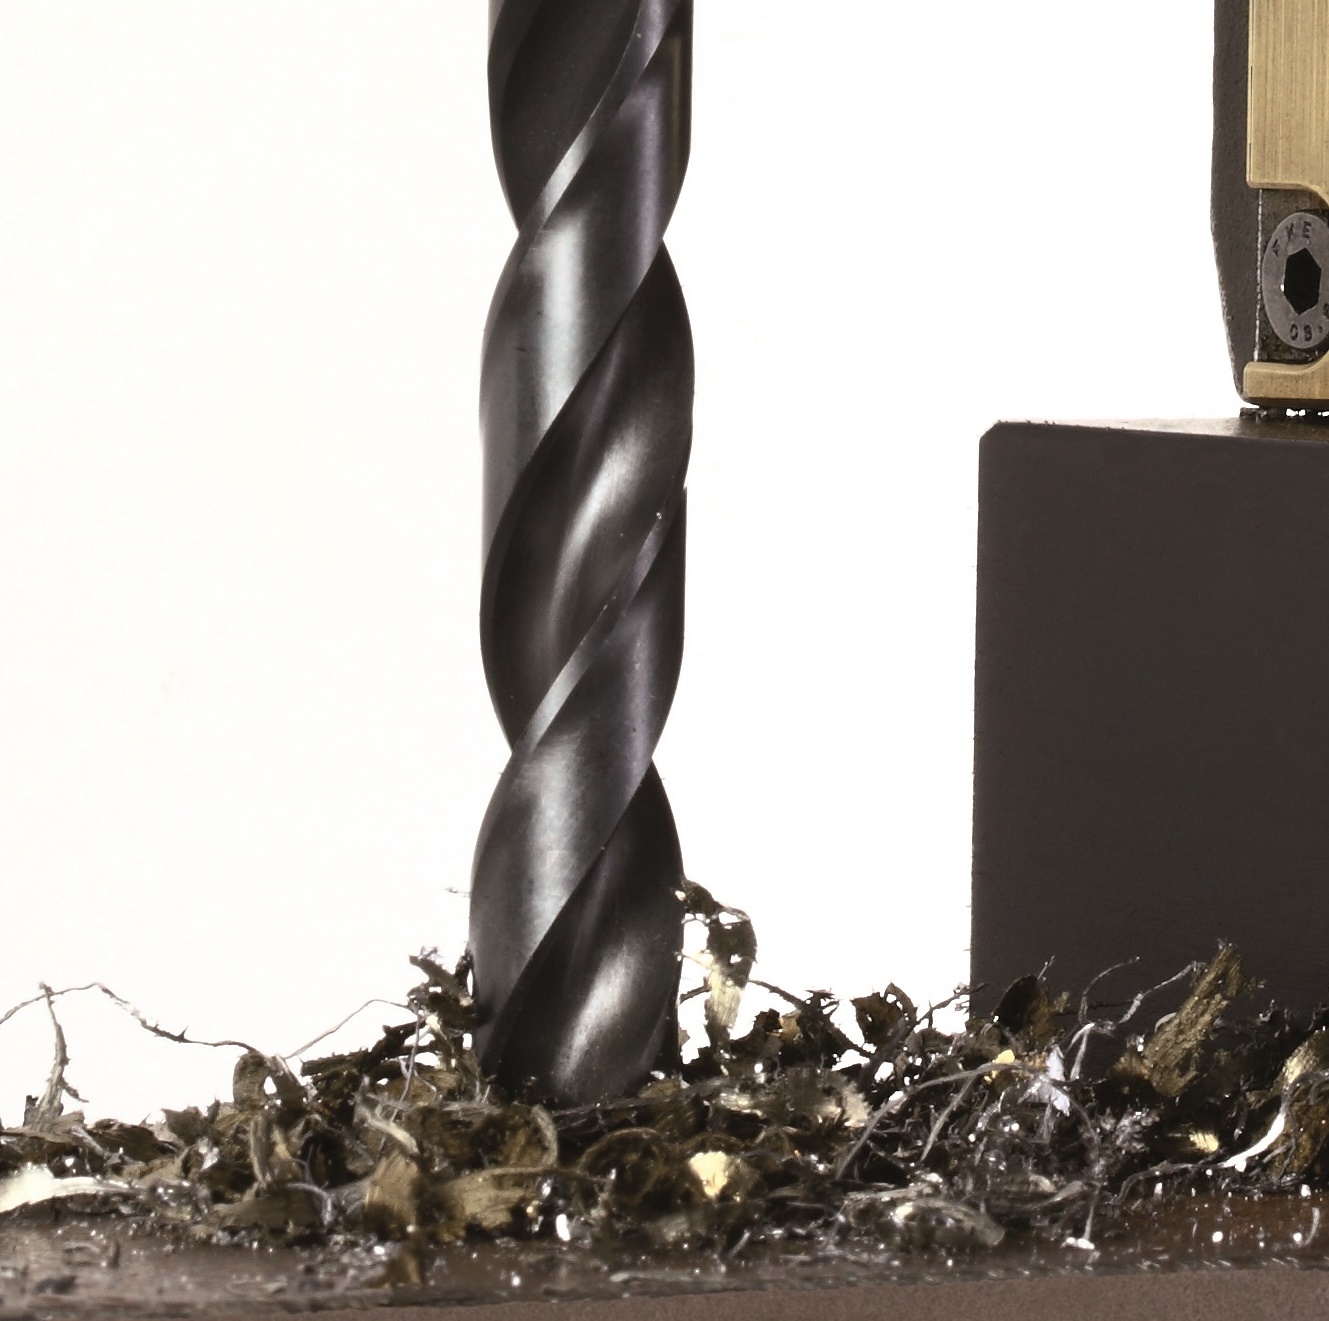
How to use TWIST DRILL bits with machines of industrial arbor?
How to use TWIST DRILL bits with machines of industrial arbor?
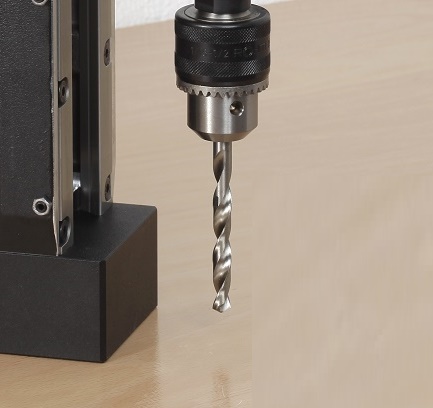
MAB 100, MAbasic 200, 400, AutoMAB 350 & AkkuMAB 3000 are the magnetic drilling machines with industrial arbor 19 mm Weldon. to Twist drill with
these machines you need two adapters,
1. Adapter for drill chuck (ZAP 100)
2. Gear rim drill chuck (ZBI 113 / ZBI 116) or you can also have Quick-Action drill chuck for faster tool change (ZSI 113 / ZSI 116)

How to use TWIST DRILL bits with machines of Morse Taper?
How to use TWIST DRILL bits with machines of Morse Taper?
MAB 455, 485, 525, 825, 845, 1300, MABasic 450, 850 & AirMAB 5000 are the magnetic drilling machines with Morse Taper. to Twist drill with these machines you need two adapters,
1. Taper drift for drill chuck (ZKD 216 for MT 2 machines / ZKD 316 for MT 3 machines )
2. Gear rim drill chuck (ZBK 113 / ZBK 116) or you can also have Quick-Action drill chuck for faster tool change (ZSB 113 / ZSB 116)
For bigger diameter of twist drills which comes with Morse Taper shaft dont need any adapter. You can directly fix the twist drill on the machine.

How to reduce a MT 2 to MT 1?
How to reduce a MT 2 to MT 1?
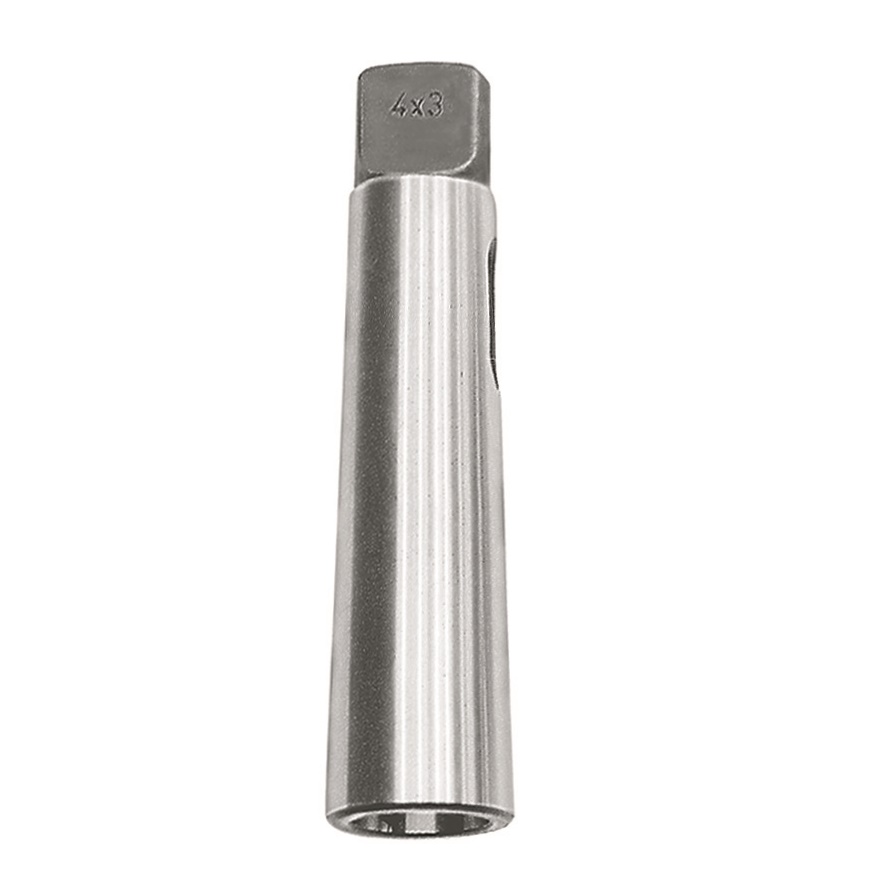
To reduce a MT 2 to MT 1 use BDS Reducing Bush DIN 285.Order number: ZRH 210
Video about how to use an annular cutter with a magnetic drilling machine?
Video about how to use an annular cutter with a magnetic drilling machine?
Categories of BDS magnetic drilling machines?
How does a MAGNET INDICATOR of a magnetic drilling machine work?
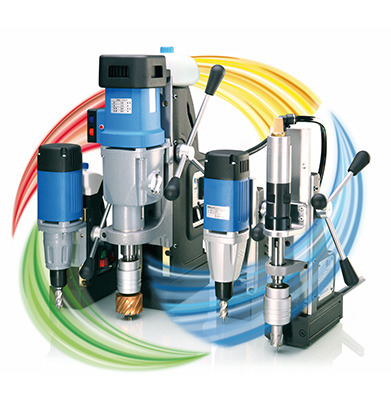
BDS have mainly four categories of magnetic drilling machines.
1. ProfiPLUS
These machines are for drilling, tapping, countersink and reaming operations.
These machines have reversible motor. This is helpful for tapping (thread cutting), because you can use clockwise direction to make the tap and then after tap is finish you can
change the motor direction to anti-clockwise and remove the tap without damaging the thread.
These machines also have variable torque control, which means motor power, its needed for tapping.
These machines have variable speed control required for drilling, tapping, countersink and reaming operations.
Also these machines are equipped with magnet indicator, carbon brush indicator, overload protection, friction clutch to avoid tool breakage, KEYLESS drill chuck for easy
change of tool, etc.
Most important these machines have oil bath gearbox. This gearbox is very robust compared to grease gearbox of other machines.

2. ProfiSTART
These machines are for ONLY for drilling because they don’t have reversible motor and don’t have torque controls.
Also these machines are equipped with magnet indicator, carbon brush indicator, Internal cabling, KEYLESS drill chuck for easy change of tool, etc.
Most important these machines have oil bath gearbox. This gearbox is very robust compared to grease gearbox of other machines.

3. ProfiBASIC
These machines are for ONLY for drilling because they don’t have reversible motor and don’t have torque controls.
The difference between these machines and above ProfiSTART machines is that ProfiBASIC machines have grease
gearbox, they do not have internal cabling, no KEYLESS drill chuck and no indicators. The purpose of these machine is to have an price economical magnetic drilling machine range.
These machines are good for regular use but for heavy duty use we recommend ProfiSTART.

4. ProfiSPEZIAL
These are special purpose drilling machines as below.

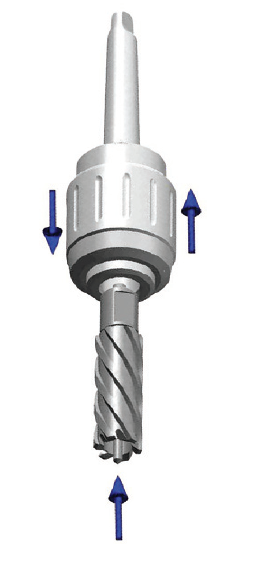
What are the functions of an EJECTOR PIN?
What are the functions of an EJECTOR PIN?
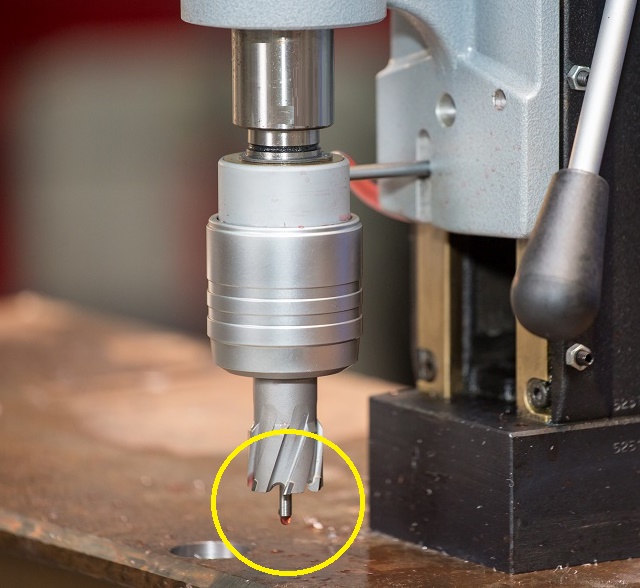
The ejector pin or also called as pilot pin has 3 major functions:
Centring: The ejector pin is exactly positioned to the centre punch mark. Switch the magnet on and the machine and tool are in the drilling position.
Oiling: By means of the automatic internal lubrication, cutting oil is supplied via the ejector pin to the bit in just the right quantity.
Ejecting: In the final stage, the ejector pin, pre-stressed by means of a spring, pushes the core out of the drill hole.

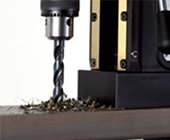
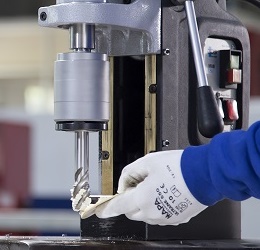
How to use an annular cutter?
How to use an annular cutter?
The below video shows the complete procedure of professionally using an annular cutter:
Step by step procedure to use an annular cutters.
Step by step procedure to use an annular cutters.
Please click on the below image to enlarge. You can also order these free posters by contacting BDS on export@bds-maschinen.de
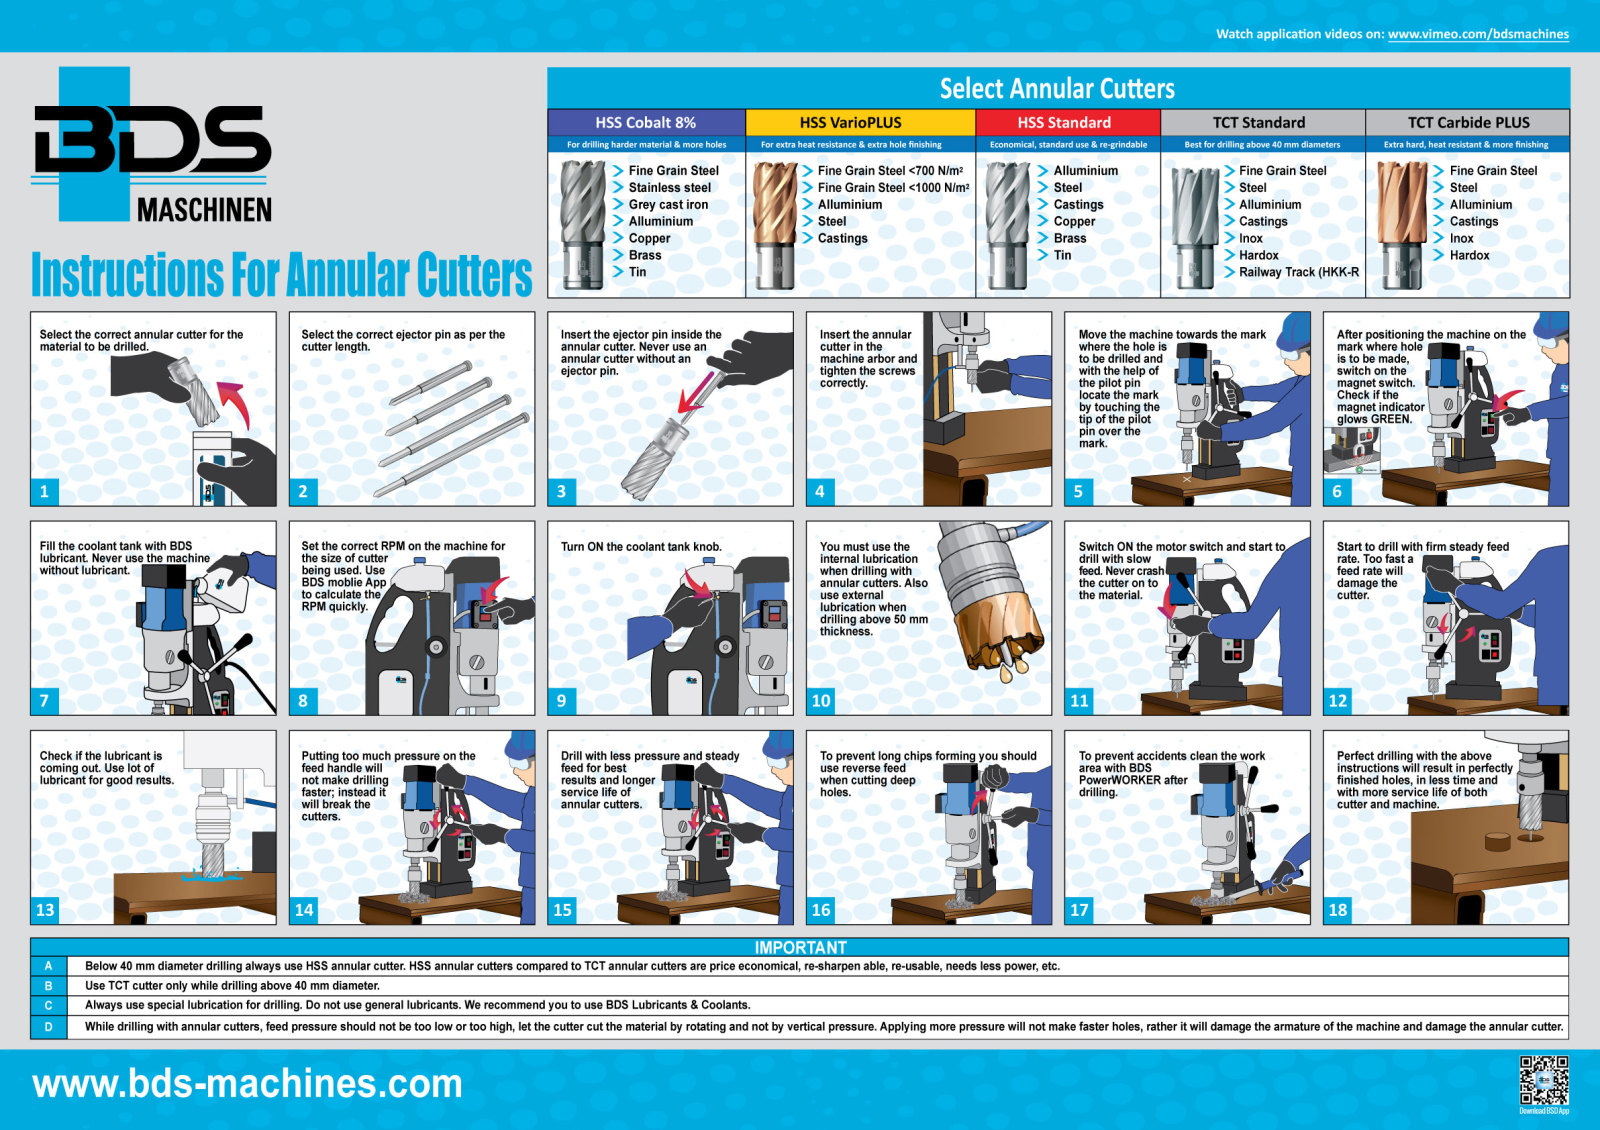
We also have the above poster in various languages like french, Spanish, Turkish, Portuguese, Italian, hindi, Tamil, Serbian, etc.
How to achieve longer length by using smaller length anular cutters?
How to achieve longer length by using smaller length anular cutters?

Achieve longer length by using smaller length anular cutters by using BDS Extention, which has 80 mm length and comes with a longer ejectpr pin ZAK 080.
Order number: ZAP 300
How to use BDS core drills with Weldon shank with other brand machines?
How to use BDS core drills with Weldon shank with other brand machines?

The BDS core drills with Weldon shank can be used with other brand of machines who do not have weldon system by using a variety of BDS adapters as shown below…

How does BDS manufacture the annular cutters?
How does BDS manufacture the annular cutters?
Please see the below video to know more about BDS core drills manufacturing at Germany.
What is the advantage of HSS Cobalt 8% core drills?
What is the advantage of HSS Cobalt 8% core drills?
The objective of this most recent product development at BDS was to produce a range of core drills optimised for power with greater heat resistance and better protection against wear.
The desired results were achieved by an enhanced proportion of cobalt in special steel. Combined with speed-controlled BDS magnetic core drilling machines,
these core drills are adapted for high loads in fine-grained steels and rust-proof materials. The core drills can be reground whilst retaining their positive product
characteristics.The HSS Cobalt 8% core drills are made from M 42 steel.
M42 is a molybdenum-series high-speed steel alloy with an additional 8% or 10% cobalt. It is widely used in metal manufacturing industries because of its
superior red-hardness as compared to more conventional high-speed steels, allowing for shorter cycle times in production environments due to higher cutting
speeds or from the increase in time between tool changes. M42 is also less prone to chipping when used for interrupted cuts and costs less when compared to the same tool made of
carbide. Tools made from cobalt-bearing high speed steels can often be identified by the letters HSS-Co. (Source: Wikipedia)
HSS Cobalt 8% Core drills are Harder, Stronger, Have more service life, Make more holes per cutter, etc.
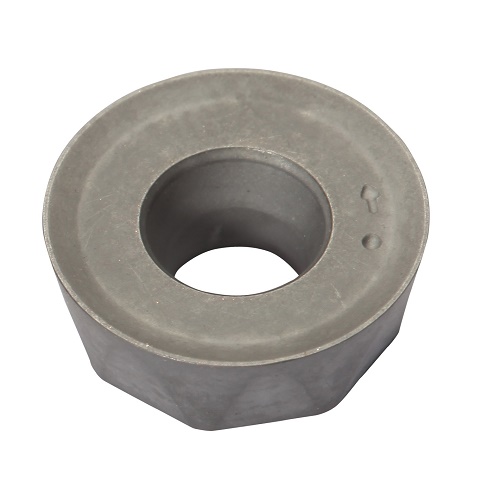
What are hard coated annular cutters?
What are hard coated annular cutters?

The hard coated annular cutters are used for high heat resistance and extra finishing.
High-strength fully ground core drills that are machined under the effect of plasma with a hard coating in the range of 2.5 μ. As a result,
these tools have considerably longer life and more uniform removal of chips, particularly with long drills.
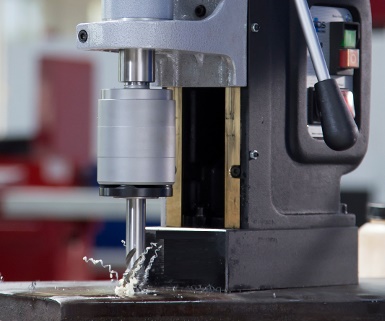
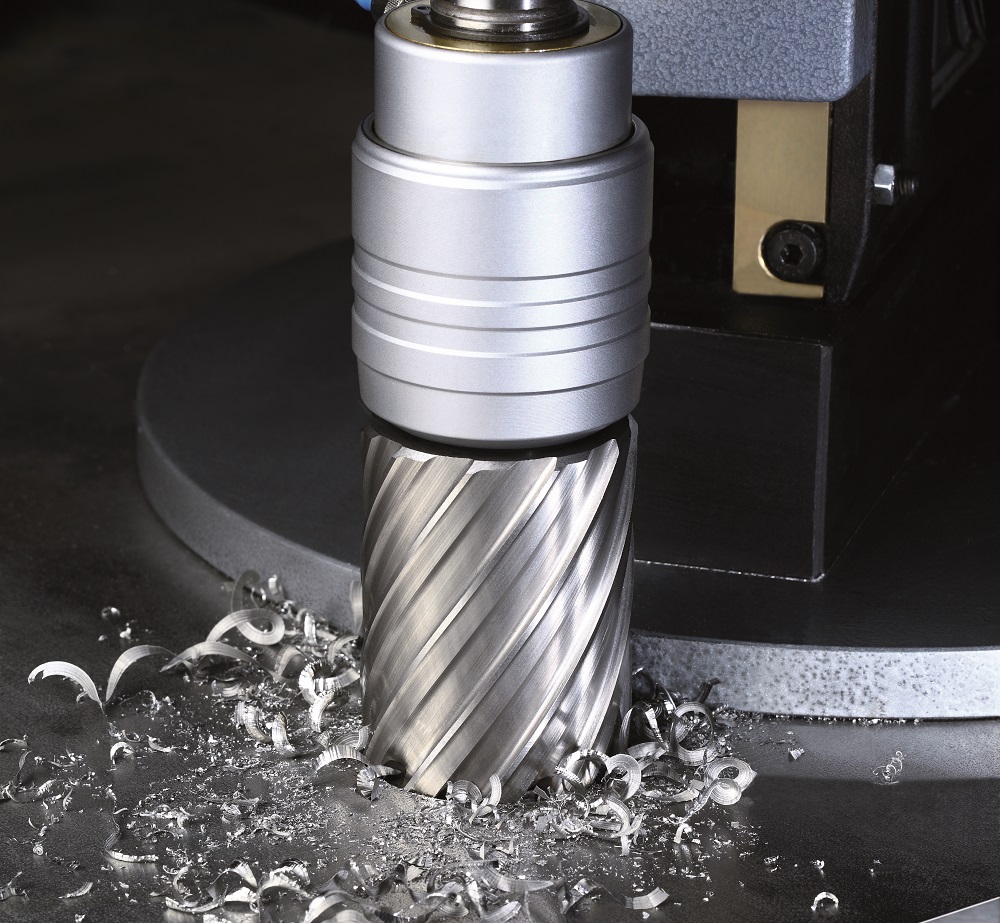
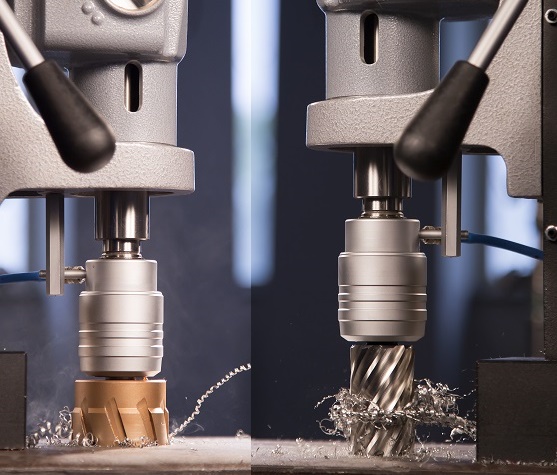
What is an annular cutter?
What is an annular cutter?
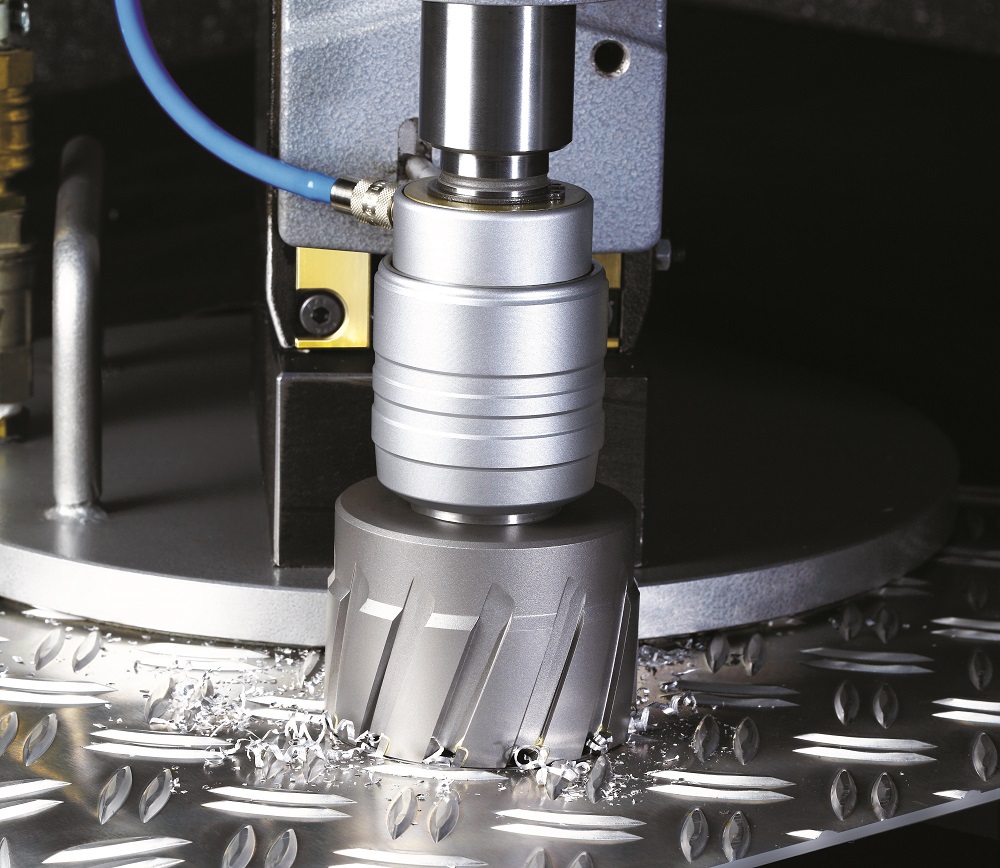
An annular cutter (also called as core drill, core cutter, broach cutter, Trepanning drill or cup-type cutter) is a hollow, multiple cutting edges cutting tool used
to make/drill holes in ferrous and non-ferrous metals. An annular cutter cuts only an annular groove at the periphery of the hole and leaves a solid core or slug at the hole center.
[1] Annular cutter is a substitute for slower, more expensive and less efficient Twist drills and Hole saws. The function of Annular Cutters is more or less same as a hole
saw but differs in geometry and material. Annular cutters are faster, easier and are more accurate than the conventional twist drills or drill bits.
An annular cutter or core drill removes the material from the metal to create cylindrical holes in a circular cross section. An annular cutter, unlike drill bits,
cuts only on the periphery of the hole to be made. Annular cutters use almost the same method as concrete core drills, but are for metal drilling. An annular cutter is a multipoint
cutting tool and is made from material like high speed steel and tungsten carbide tips.
Annular cutters are available in different sizes generally starting from diameter 12 mm (1/2’’) to 200 mm (7 7/8’’) and larger if required. The length of the annular cutter can be
achieved depending upon the thickness of the material to be drilled. In the market the lengths 30 mm, 55 mm, 75 and 110 mm annular cutters are popularly available. These sizes
though vary from manufacturer to manufacturer. The annular cutter’s material should be harder than the material to be drilled. Therefore there are various types of material
used to manufacture annular cutters, for example different types HSS and TCT material. Annular cutters are also called as core drills because, after drilling hole, the drilled material
is ejected from the cutter in the form of a cylindrical blank, this blank is called a core.
Source:(Wikipedia)
Advantages of annular cutters or core drills?
Advantages of annular cutters or core drills?
As an annular cutter cuts only on the periphery of the hole to be made, it has to remove much less material as compared to conventional drill bits which cut and remove the complete
material of the hole. Annular cutters are considered to be 3 to 4 times faster than conventional drill bits. Also while using a twist drill bit or metal hole saw one has to do
pre-drilling and step-drilling operations for bigger diameter holes, whereas an annular cutter requires no pre-drilling and step-drilling. It is a one-shot drilling operation.
The annular cutters have less teeth and less wear, therefore with an annular cutter holes can be made at higher or faster cutting speed and a faster feed rate of the drilling machine.
Energy savings
Because annular cutters do not have to drill/cut through the complete work piece, they require less thrust and thus less energy to drill through material.[6]
More finishing
The hole made using an annular cutter is more finished, precise and accurate.
Easy
Due to the unique geometry of the annular cutters, making holes at awkward angles is also very easy.[6]
Efficient cooling
The cooling of annular cutters is internal. The internal lubrication is provided through a hole with the help of a pilot pin. Internal lubrication makes the annular cutter faster
and more efficient for deep hole drilling.
Best for light duty machines
As the annular cutters require very low RPM (from min 50 RPM), these cutters can be easily used with light duty drilling machines or portable magnetic base drilling machines.[6]
150 mm dimater X 55 mm length TCT Core Drill
Sizes
Annular cutters biggest advantage is the variety of sizes. Annular cutters start from 12 mm diameter up to 150 mm diameter and more if required. Various cutting depth (length)
of annular cutters can be sourced depending upon the requirement.
Re-sharpening
A HSS annular cutter can be easily re-sharpened on a grinding machine and can be re-used for drilling. Re-grinding can be done until the desired cutting length is available on
the annular cutter.
Source:(Wikipedia)
HSS core drills V/S TCT core drills.
HSS core drills V/S TCT core drills.
HSS core drills are cheaper than the TCT core drills for smaller diameters up to 40 mm, while TCT core drills are cheaper than HSS for diameters above 41 mm.
Re-sharpening
Once the HSS cutter loses its sharpness, it can be re-ground on a grinding machine and can be used again. While, re-grinding the TCT core drill is possible but very difficult
and time consuming.
Defect
The chances of defect in TCT core drills is more because the tungsten carbide tips are glued on the core drill and when the core drill falls down or crashes on the material,
the chances tip breakage is more. A HSS cutter on the other hand a complete made of one material.
Speed
TCT cutter biggest advantage is speed and ease in which it may cut harder materials. Especially for larger diameter TCT core drills are very successful. While HSS core drills are
good when drilling not very hard material and for small diameter hole sizes.
Hardness
Hardness of TCT core drills is more than the HSS core drills.
Source:(Wikipedia)
Difference between twist drill and core drill?
Difference between twist drill and core drill?

Source:(Wikipedia)
Which core drills should be used for hard stainless steel material, HARDOX and INOX?
Which core drills should be used for hard stainless steel material, HARDOX and INOX?

We recomend to use TCT Coated core drills. Because these TCT cutters are harder and the coating makes the cutter more heat resistant.
BDS Name: CarbidePLUS
Order number: HKK-P
We also highly recomend to use BDS 6000 water soluble lubricants.
BDS Name: BDS 6000
Order number: ZHB 001
Source:(Wikipedia)
Which lubricant should be used for overhead or horizontal drilling?
Which lubricant should be used for overhead or horizontal drilling?
While drilling overhead with liquid lubricants will lead to damage the motor of the machine due to the lubricant entering the motor. Thus we recomend to use BDS 5500
high performance cutting paste to drill overhead or in horizontal situation. This cutting paste is suitable for both HSS and TCT core drills as well as for thread cutting tools/Taps.
BDS Name: BDS 5500
Order number: ZHS 550
Which type of coolant / lubricant should be used for TCT Core drills?
Which type of coolant / lubricant should be used for TCT Core drills?
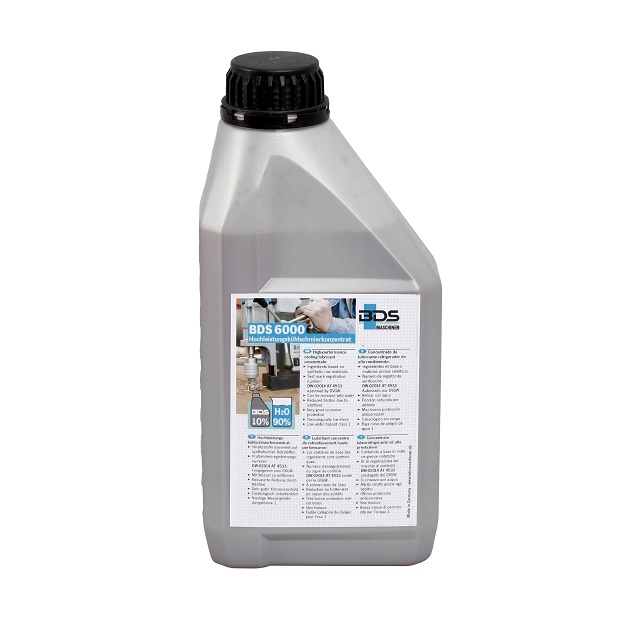
For TCT (Tungsten carbide tipped) annular cutters we recomend to use:
Cooling lubricant concentrate 6000
For high demands based on synthetic raw materials
Miscible with water, biostable and mild smelling
Improves the core drill service life.
Toxicologically harmless, water hazard class 1.
Which type of coolant / lubricant should be used for HSS Core drills?
Which type of coolant / lubricant should be used for HSS Core drills?

For HSS (high speed steel) annular cutters we recomend to use:
High-performance cutting oil 5000
Pure vegetable oil that is not a hazardous good in the context of transport regulations. The base materials used are not listed in the catalogue of substances hazardous to water.
BDS 5000 is not subject to labelling.
Organic basic material with additives.
Water hazard class 1.
Bio-degradable, optimal base adjustment of the viscosity for the use of BDS core drills, and easy use for subsequent galvanising
#3
What are the fundamental safety precautions for SKF 25 plate beveling machine?
What are the fundamental safety precautions for SKF 25 plate beveling machine?
Do not use the machine in flammable or potentially explosive environments.
Persons who are unable to operate the machine due to their physical, mental or motor response abilities may only use the machine under supervision of or instruction by a responsible
person.
Children must not be allowed to use the machine.
Inspect the machine for visible signs of damage before use. Do not use a damaged machine.
Before beginning work, check the function of the switches on the machine.
Repairs to the mains cable may only be carried out by a quali¬fied electrician.
Repairs to the machine may only be carried out by an author¬ised specialist workshop or by the works customer service. Unqualified repairs can lead to considerable danger for the user.
Repairs to the machine during the warranty period may only be carried out by a service centre authorised by the manufac¬turer otherwise the guarantee will be invalidated.
Defective parts may only be replaced with original spare parts. Only original spare parts guarantee that the safety requirements are met.
Do not leave the machine unsupervised during operation.
Store the machine in a dry, temperate location out of the reach of children.
Do not leave the machine standing outdoors and do not ex¬pose it to moisture.
Make sure that your work area is sufficiently lit (>300 Lux).
Do not use low power machines for heavy working.
Make sure that your workplace is clean.
Keep the machine clean, dry and free of oil and grease.
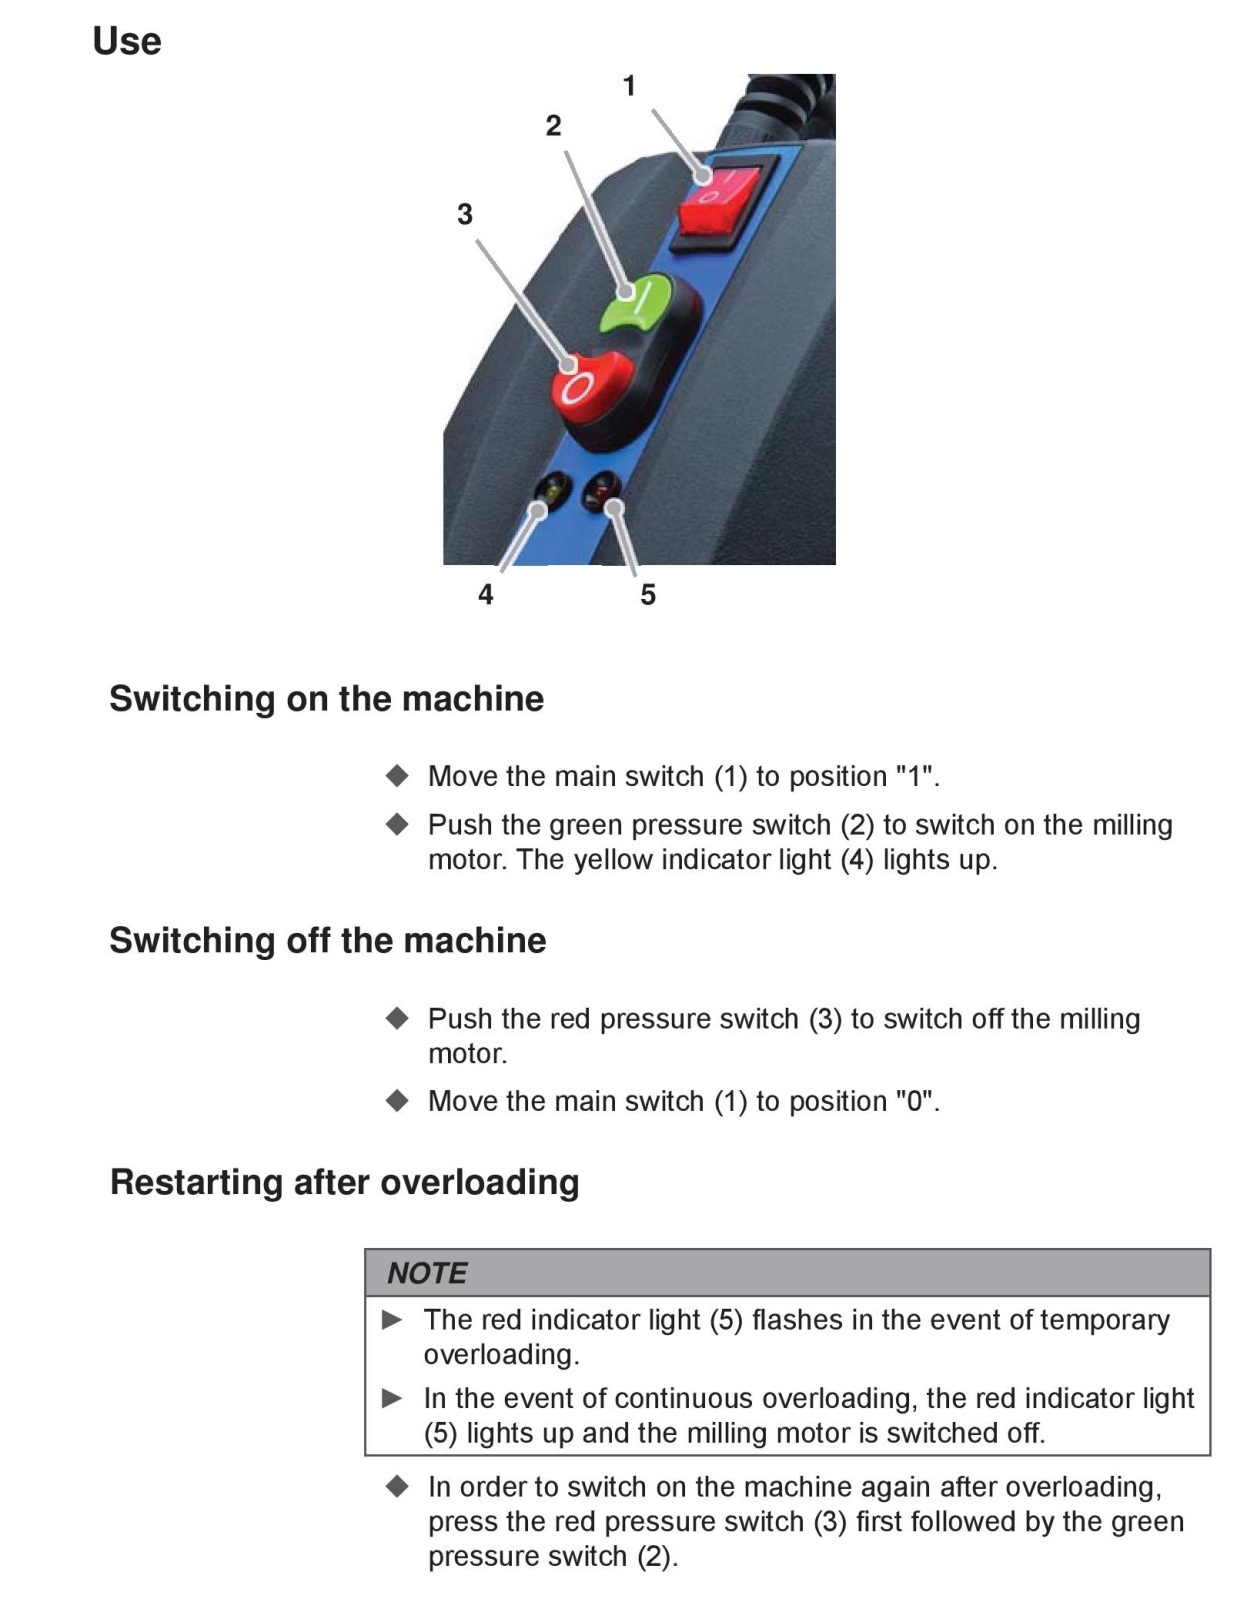
SKF 25 plate beveling machine stoped?
SKF 25 plate beveling machine stoped?
A motor protection switch protects the milling motor against overloading. Switch OFF the machine and re-start after few minutes.
Condition of the plate before using plate beveling machines?
Condition of the plate before using plate beveling machines?

The surface of the workpiece must meet the following requirements:
The surface must be smooth and may not have any burn points, slag, welding joints or similar.
Before beginning with milling, remove surface unevenness.
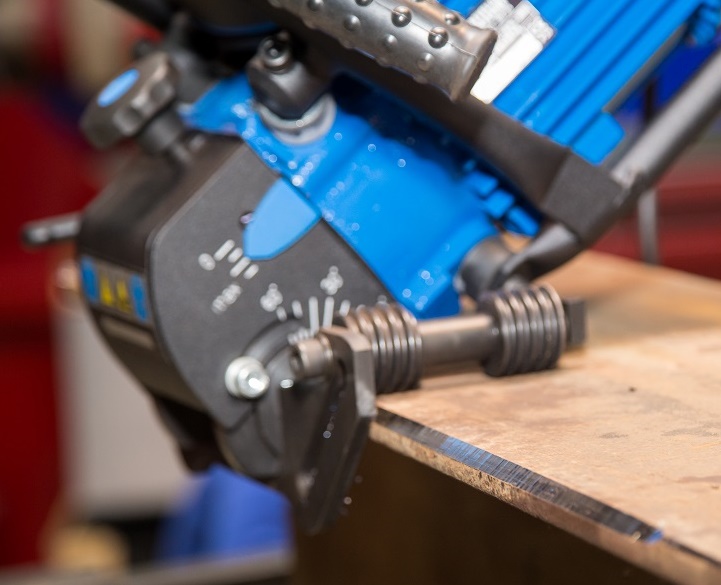
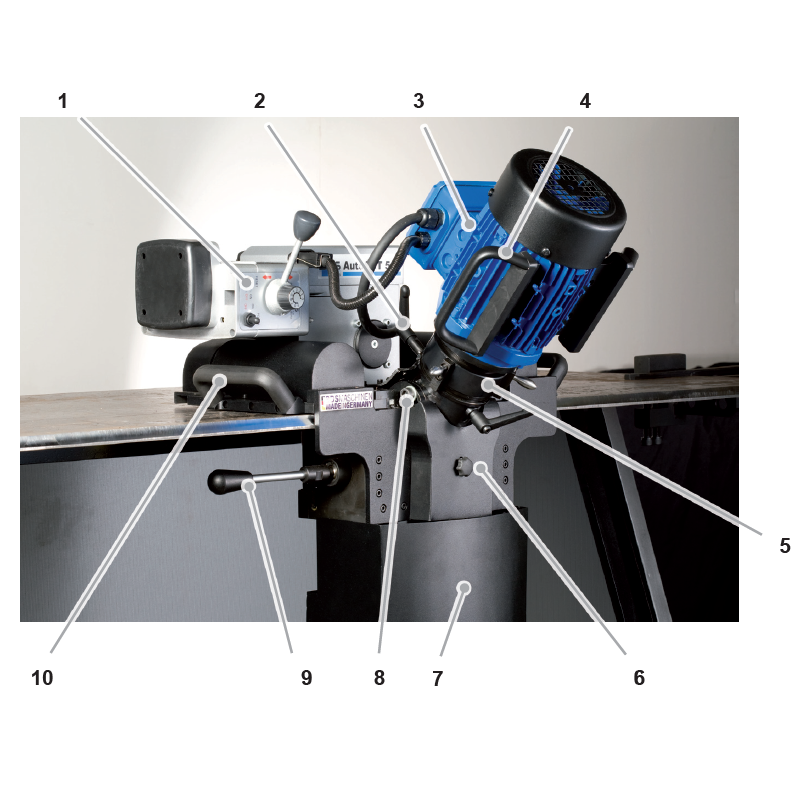
How to set the milling head of SKF 25 beveling machine?
How to set the milling head of SKF 25 beveling machine?
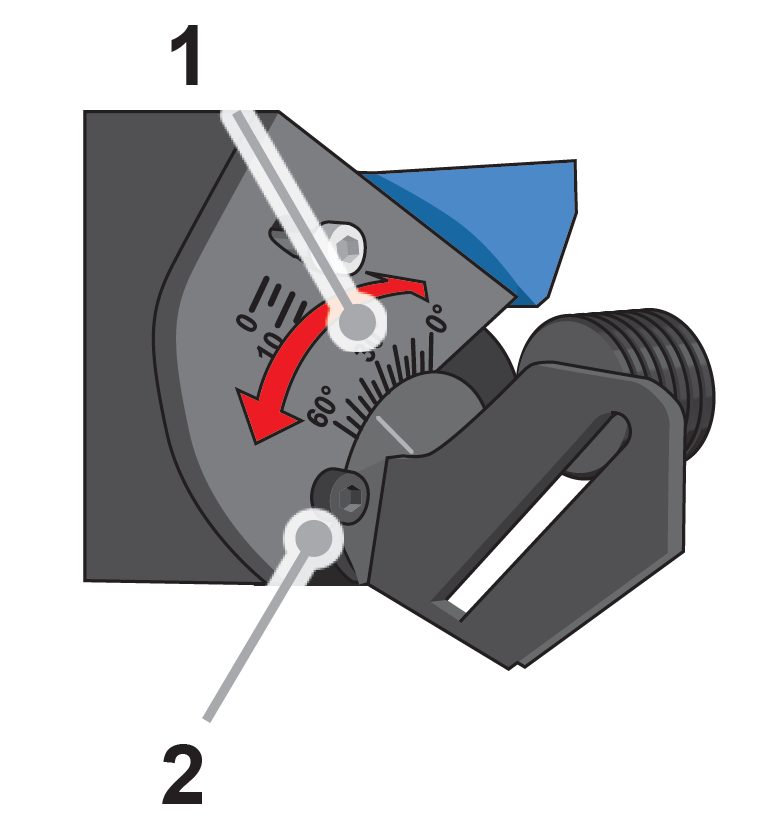
Place the machine onto the upper side (power connecting cable ).
Release the locking mechanism (2) on both sides of the machine.
Set the desired milling angle. The milling angle can be viewed on the scale (1).
Tighten the locking mechanism (2) on both sides of the machine.
How to set the chamfer width of SKF 25 beveling machine?
How to set the chamfer width of SKF 25 beveling machine?
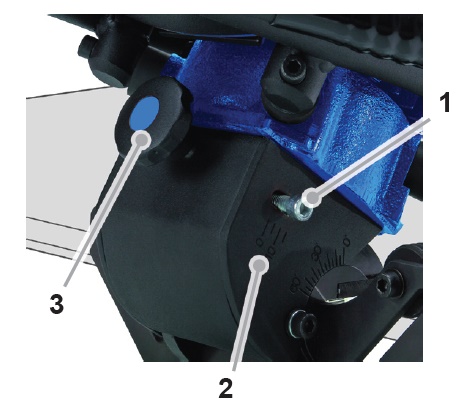
Place the machine onto the upper side (power connecting cable).
Release the locking mechanism (1).
Set the desired chamfer angle by turning the adjusting screw (3). The chamfer width can be viewed on the scale (2).
Tighten the locking mechanism (1).
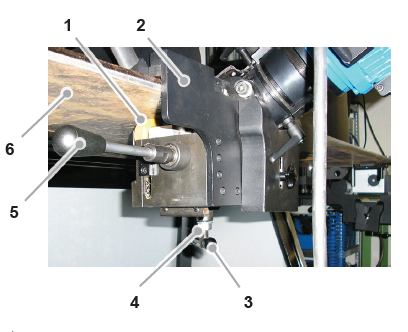
How to mount the roller of SKF 25 beveling machine?
How to mount the roller of SKF 25 beveling machine?

Mount the plate (3) according to the illustration.
Fix the guide rollers (2) in the borehole (1) with the washer and nut.
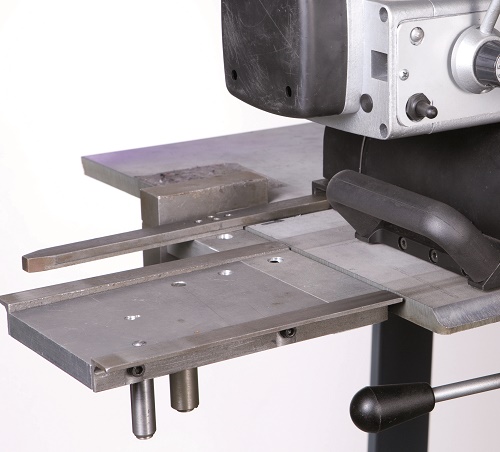
How to bevel pipes with SKF 25 machine?
How to bevel pipes with SKF 25 machine?

Mount the plate (1) according to the illustration.
Fix the guide rollers (3) within the oblong hole with the tnuts (1). The position within the oblong hole depends on the pipe diameter.
Troubleshoot for SKF 25 plate beveling machine?
Troubleshoot for SKF 25 plate beveling machine?


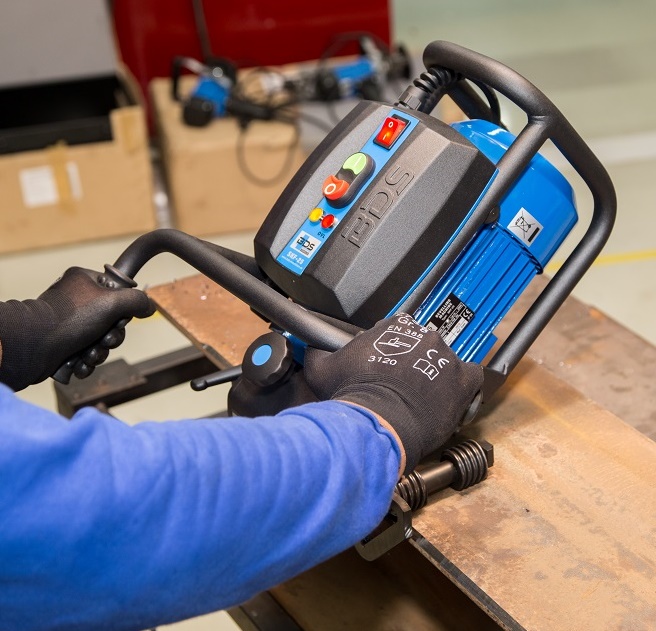
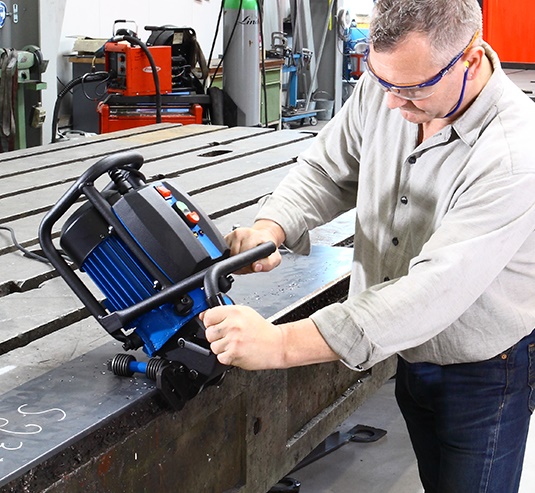
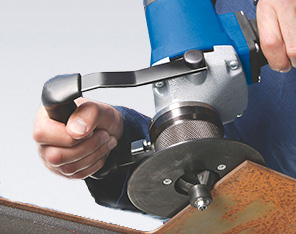
How to operate SKF 25 plate beveling machine?
How to operate SKF 25 plate beveling machine?


Is there any video for SKF 25 plate beveling machine?
Is there any video for SKF 25 plate beveling machine?
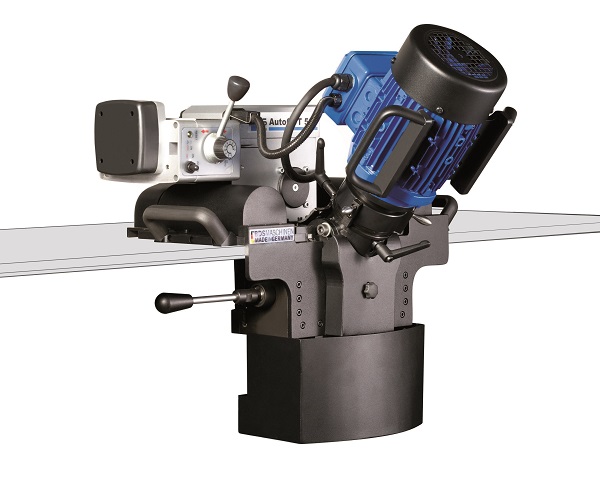
What are the components of AutoCUT 500 automatic beveling machine?
What are the components of AutoCUT 500 automatic beveling machine?

How to position the AutoCUT 500 automatic beveling machine?
How to position the AutoCUT 500 automatic beveling machine?
How to position the AutoCUT 500 automatic beveling machine?


” class=”img-responsive”>
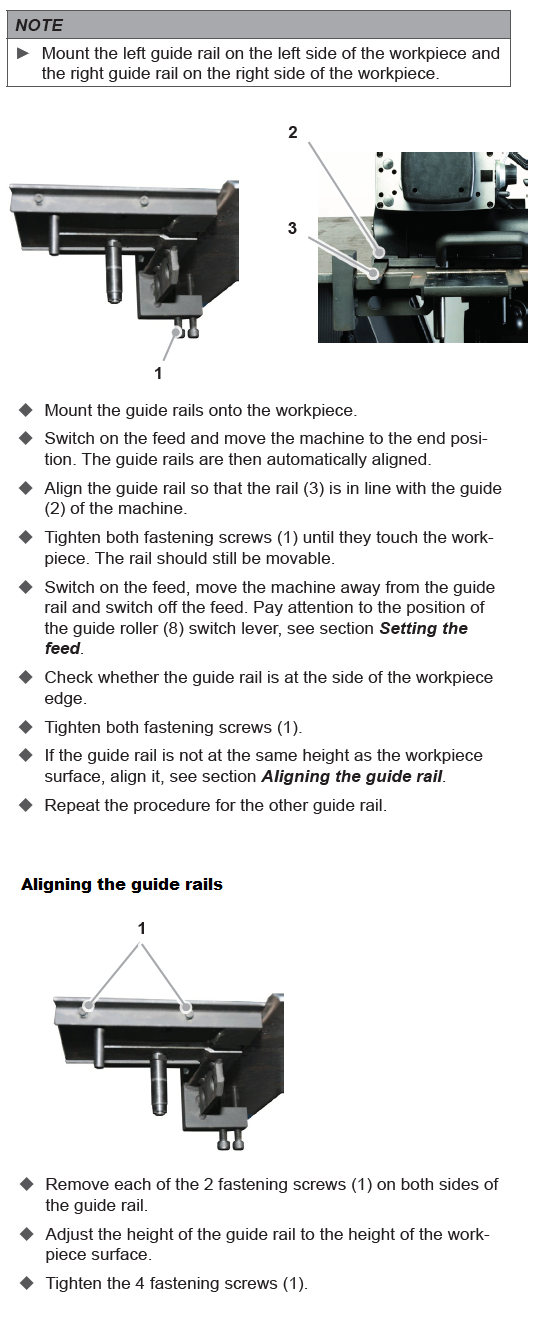
How to mount and align the guide rails of AutoCUT 500 machine?
How to mount and align the guide rails of AutoCUT 500 machine?
How to set the cutting head and cutting depth of AutoCUT 500 beveling machine?
How to set the cutting head and cutting depth of AutoCUT 500 beveling machine?


Chamfer width/milling angle ratio for AutoCUT 500 beveling machine?
Chamfer width/milling angle ratio for AutoCUT 500 beveling machine?

Troubleshooting for AutoCUT 500 automatic plate beveling machine?
Troubleshooting for AutoCUT 500 automatic plate beveling machine?
Can the AutoCUT 500 and SKF 25 bevel stainless steel plates?
Can the AutoCUT 500 and SKF 25 bevel stainless steel plates?

Yes, the AutoCUT 500 and SKF 25 bevel stainless steel plates.
What is the life of the inserts on AutoCUT 500 automatic plate beveling machine?
What is the life of the inserts on AutoCUT 500 automatic plate beveling machine?
8 sides = 400 meters.
BDS Order number: SHM 400
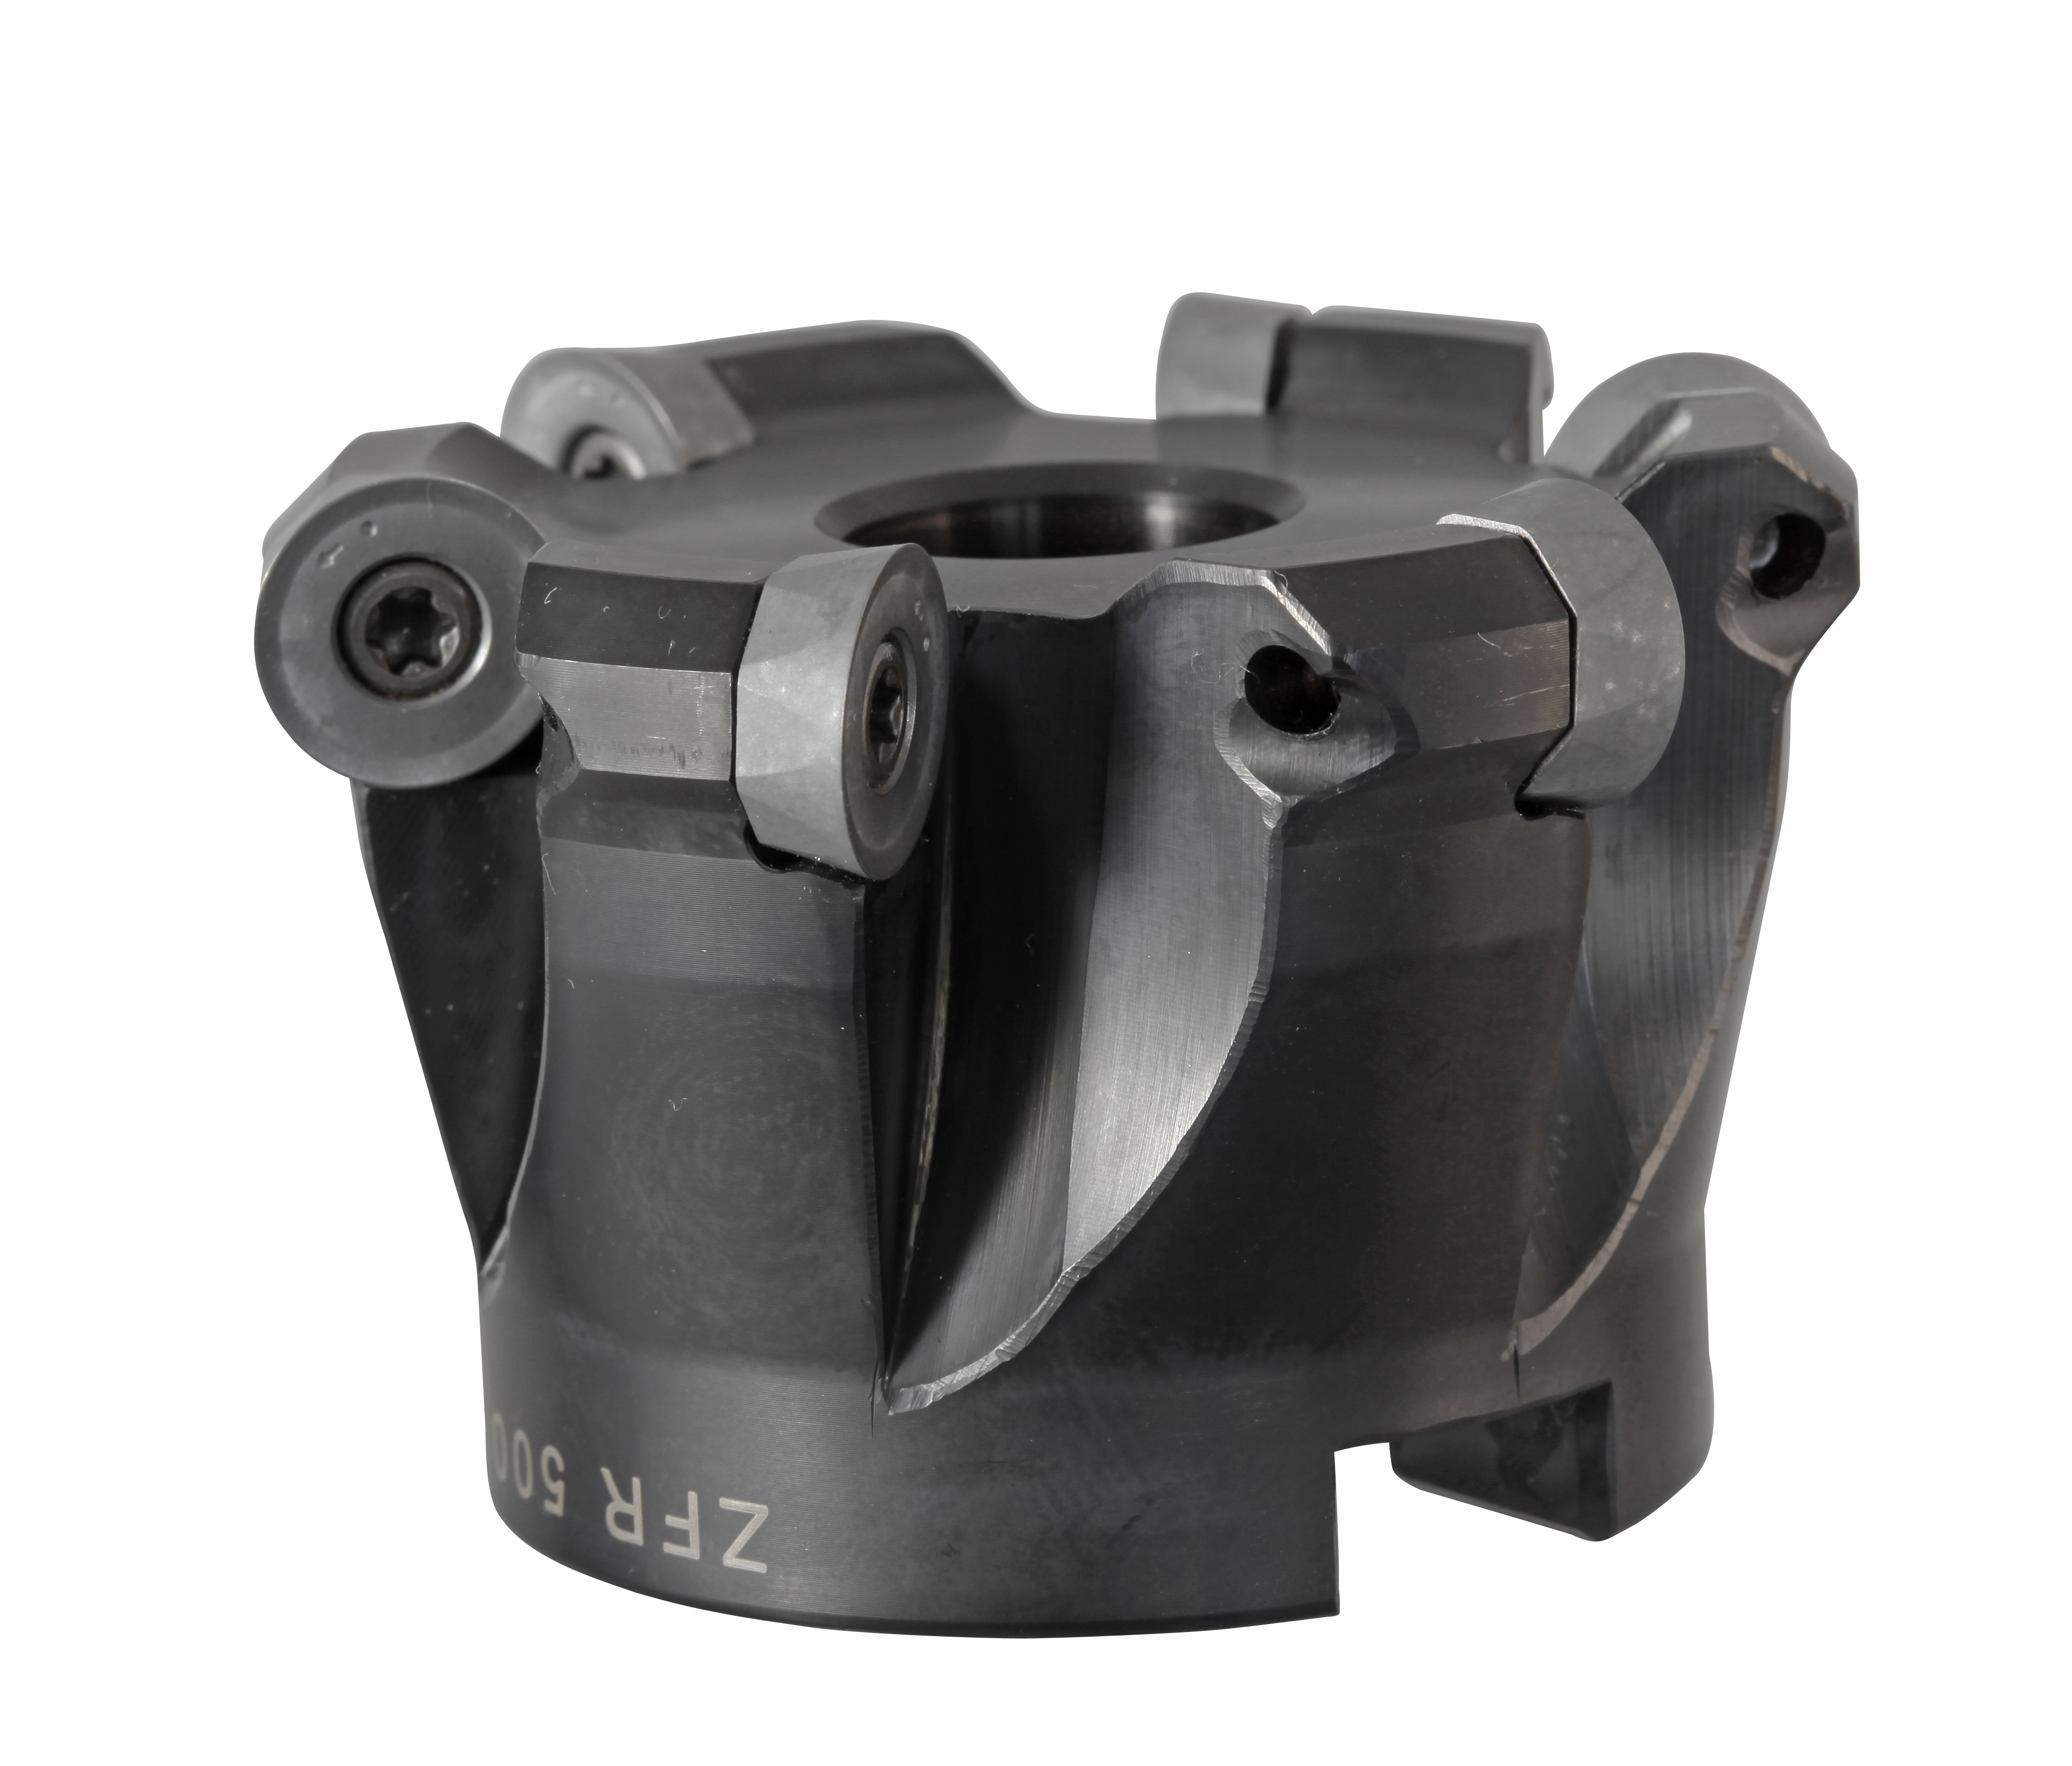
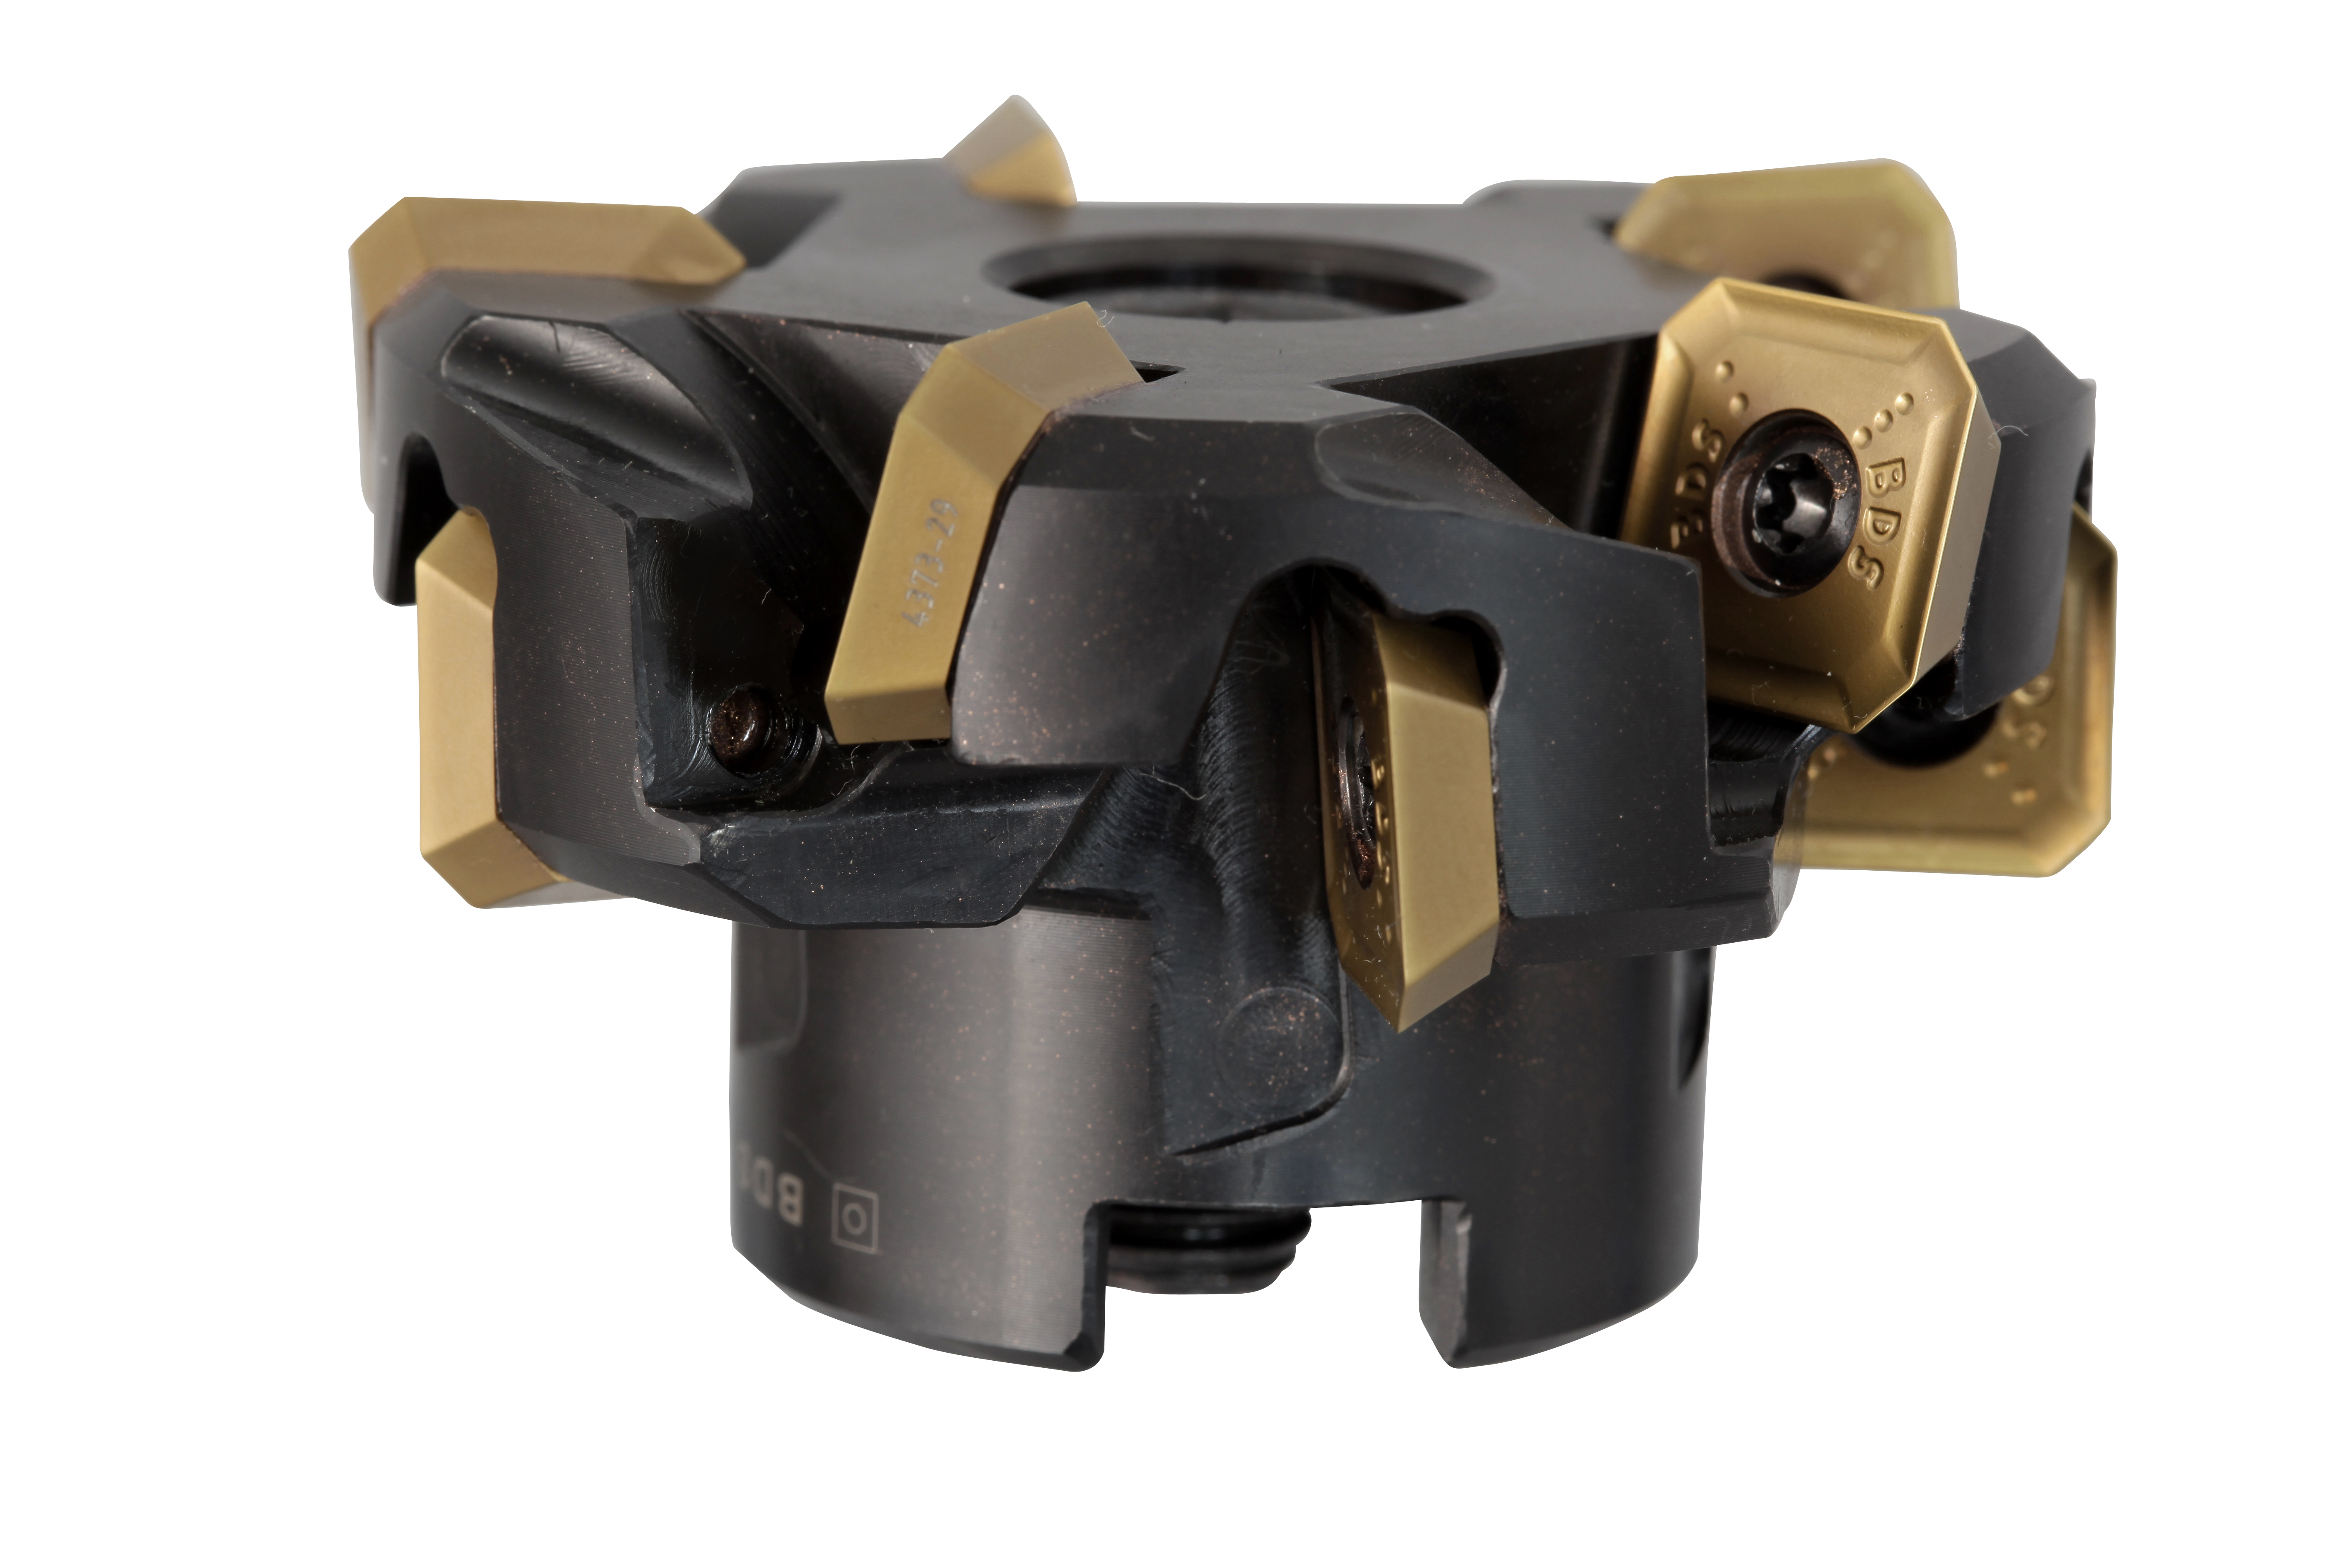
Which milling cutter does the Auto CUT 500 automatic beveling machine use?
Which milling cutter does the AutoCUT 500 automatic beveling machine use?
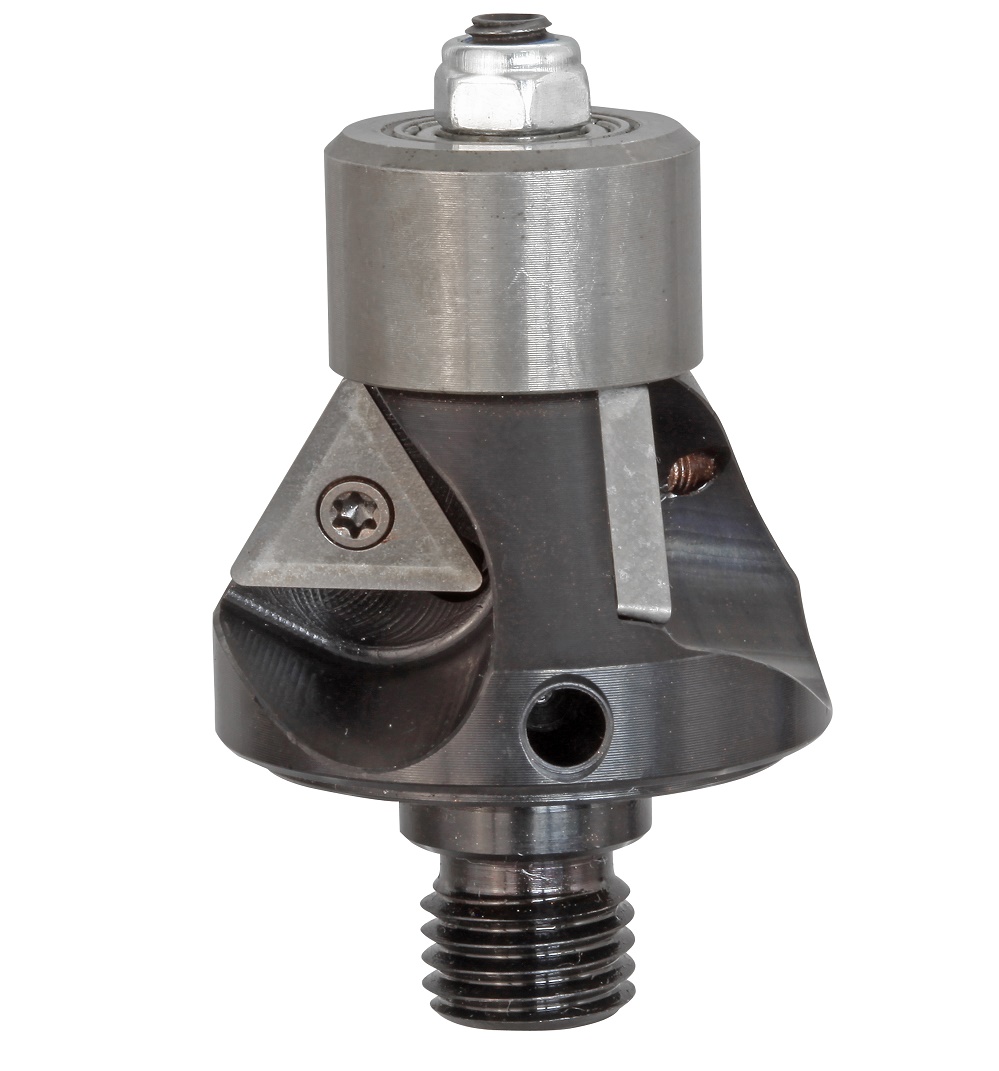
Which milling cutter does the SKF 25 beveling machine use?
Which milling cutter does the SKF 25 beveling machine use?
Which milling cutter does the EKF 300.3 chamfering machine use?
Which milling cutter does the EKF 300.3 chamfering machine use?
Which milling cutter does the EKF 450.3 chamfering machine use?
Which milling cutter does the EKF 450.3 chamfering machine use?

Which milling cutter does the EKF 452.3 chamfering machine use?
Which milling cutter does the EKF 452.3 chamfering machine use?

How to set up the EKF chamfering machines?

How to lock the ON/OFF switch in the switched-on position of EKF machine?
How to lock the ON/OFF switch in the switched-on position of EKF machine?
How to operate the EKF chamfering machine?
How to operate the EKF chamfering machine?
Set the chamfer height, see section Setting the chamfer height.
Insert the plug into the mains socket.
Clasp both handles and put the machine upright with the supporting plate onto the workpiece so that the milling milling cutter does not move onto the workpiece.
Switch the machine on, see section Switching on the machine.
Wait until the maximum speed is reached. This process takes approx. 3 seconds.
Push the machine slowly and evenly in the opposite running direction of the tool.
Before switching off, remove the machine from the tool.
Switch off the machine, see section Switching off the machine.
Pull the plug out of the mains socket.
How to replace the milling cutter of EKF chamfering machines?
How to replace the milling cutter of EKF chamfering machines?

Troubleshooting for EKF chamfering machines?
Troubleshooting for EKF chamfering machines?